Support our educational content for free when you purchase through links on our site. Learn more
🤖 25+ Amazing Things You Can Do with a Raspberry Pi (2026)
Ever held a computer the size of a credit card and wondered, “What on earth is this tiny thing actually used for?” You aren’t alone. When the first Raspberry Pi launched in 2012, the world thought it was just a $35 toy for teaching kids to code. But here’s the twist: that little board has quietly evolved into the brain behind everything from self-driving robots to entire home security systems, with over 30 million units sold worldwide.
At Why Pi™, we’ve spent years turning these tiny boards into everything from retro gaming powerhouses to private cloud servers. We remember the day we first hooked up a Raspberry Pi 4 to a 4K monitor; we expected it to stutter, but it handled our entire office workflow like a champ. It turns out, the only limit to what a Raspberry Pi can do is your imagination (and maybe your patience with soldering!).
In this ultimate guide, we’ll walk you through 25+ incredible projects, ranging from beginner-friendly smart home hubs to advanced Kubernetes clusters. Whether you want to block ads across your entire network, build a handheld gaming console, or create your own private AI, we’ve got the step-by-step insights you need. Ready to stop wondering and start building? Let’s dive in.
Key Takeaways
- Unmatched Versatility: The Raspberry Pi is a single-board computer capable of running full desktop operating systems, acting as a media center, controlling robotics, and hosting private servers.
- Cost-Effective Innovation: With prices starting as low as $15 for the Zero series, it offers a budget-friendly entry point into electronics, coding, and home automation without breaking the bank.
- Privacy & Control: It empowers users to self-host services like ad-blockers (Pi-hole), media servers (Plex/Jellyfin), and cloud storage, keeping your data off commercial servers.
- Educational Powerhouse: It remains the gold standard for STEM education, teaching Python, Scratch, and physical computing to students of all ages.
- Scalable Projects: From simple LED blinkers to complex Kubernetes clusters and edge AI applications, the Pi grows with your skills.
💡 Pro Tip: Not sure which model to start with? Check out our detailed breakdown of the Raspberry Pi 4 Model B vs. Raspberry Pi Zero 2 W to find the perfect match for your project needs!
Table of Contents
- ⚡️ Quick Tips and Facts
- 📜 From Classroom to Cloud: A Brief History of the Raspberry Pi
- 🏠 Home Automation and Smart Home Hubs
- Building a DIY Smart Home Controller
- Automating Lights, Locks, and Thermostats
- Creating a Voice Assistant with Home Assistant
- 🎮 Retro Gaming Consoles and Emulation Stations
- Setting Up RetroPie and Laka
- The Ultimate Handheld Gaming Device
- Multi-Console Arcade Cabinets
- 🖥️ Desktop Computing and Productivity Workstations
- Replacing Your Old Laptop for Web Browsing
- Coding, Programming, and Learning Python
- Lightweight Office and Media Consumption
- 📡 Network Ad Blockers and Privacy Tools
- Installing Pi-hole for Ad-Free Internet
- Securing Your Home Network with a Firewall
- Running a Private DNS Server
- 📹 Media Centers and Streaming Servers
- Building a Plex or Jellyfin Server
- Kodi-Based Media Players
- Transcoding and Streaming to Multiple Devices
- 🤖 Robotics, IoT, and Hardware Projects
- Controlling Robots and Drones
- Environmental Monitoring and Weather Stations
- Smart Agriculture and Hydroponics Systems
- ☁️ Cloud Storage and Personal Servers
- Setting Up a Private NAS (Network Attached Storage)
- Running Your Own Web Server and Blog
- Self-Hosted Email and File Sharing
- 🎓 Education, STEM, and Coding for Kids
- Teaching Python and Scratch Programming
- Electronics and Circuitry Experiments
- Robotics Competitions and School Projects
- 🛡️ Cybersecurity Labs and Penetration Testing
- Setting Up a Kali Linux Environment
- Network Traffic Analysis and Monitoring
- Ethical Hacking Practice Grounds
- 🖨️ 3D Printing and CNC Control
- OctoPrint for Remote 3D Printing
- Controlling CNC Machines and Laser Cuters
- Firmware Updates and Printer Monitoring
- 📊 Data Science, Machine Learning, and AI
- Running TensorFlow and PyTorch Models
- Image Recognition and Computer Vision Projects
- Edge AI and Real-Time Data Processing
- 🚀 Advanced Use Cases: Kubernetes Clusters and High-Performance Computing
- Building a Home Kubernetes Cluster
- Distributed Computing and Rendering Farms
- Load Balancing and Microservices Architecture
- 🛠️ Troubleshooting, Power Supply, and Best Practices
- Choosing the Right Power Adapter and SD Card
- Cooling Solutions: Heatsinks and Fans
- Common Errors and How to Fix Them
- 🏆 Conclusion
- 🔗 Recommended Links
- ❓ FAQ
- 📚 Reference Links
⚡️ Quick Tips and Facts
Welcome to Why Pi™, where our team of educators and engineers are passionate about unlocking the potential of single-board computers! If you’ve
ever wondered, “What is a Raspberry Pi used for?”, you’re in for a treat. This tiny, credit-card-sized computer, first launched commercially in 2012, has revolutionized how we approach everything from coding education
to advanced home automation. It’s a versatile, low-cost, and powerful device that truly puts a computer in the palm of your hand, as the first YouTube video on this topic aptly puts
it.
Here are some quick facts to get you started on your Raspberry Pi journey:
- What it is: A series of small single-board computers (SBCs) developed in the UK
by the Raspberry Pi Foundation. - Purpose: Originally designed to promote the teaching of basic computer science in schools and developing countries.
- Operating System: Primarily runs Raspberry Pi OS (a Debian-based Linux distribution), but can also
run Ubuntu, Windows 10 IoT Core, and various specialized distributions like RetroPie or LibreELEC. - Cost-Effectiveness: Known for its affordability, making it accessible for hobbyists,
students, and professionals alike. - Key Components: Features a System on a Chip (SoC) with a CPU, GPU, RAM, USB ports, HDMI output, Ethernet, Wi-Fi, Bluetooth, and General Purpose Input/Output
(GPIO) pins for hardware interfacing. - Storage: Boots from a microSD card, which acts as its primary storage.
- Popularity: Over 30 million
units sold since its inception, demonstrating its widespread appeal and utility.
📜 From Classroom to Cloud: A Brief History of the Raspberry Pi
The story of the Raspberry Pi is one of humble beginnings and phenomenal growth. Conceived by a group of academics at the University of Cambridge’s Computer Laboratory, including Eben
Upton, the initial goal was to address a worrying decline in the number and skill level of students applying for computer science courses. They envisioned a cheap, programmable computer that could inspire a new generation to tinker, code, and innovate.
The first
model, the Raspberry Pi 1 Model B, hit the market in February 2012, priced at a mere $35. It was an instant hit, far exceeding initial sales expectations. We remember the excitement vividly here at Why Pi™
! It wasn’t just educators who were captivated; hobbyists, makers, and even small businesses quickly realized the potential of this tiny powerhouse. The name itself is a nod to early tech companies that named products after fruits, combined with ”
Pi” for Python, the programming language central to its educational mission.
Over the years, the Raspberry Pi Foundation has released numerous iterations, each more powerful and feature-rich than the last. From the ultra-compact Raspberry Pi
Zero series, perfect for embedded projects, to the robust Raspberry Pi 4 Model B with up to 8GB of RAM and a quad-core processor, the evolution has been remarkable. This continuous improvement has broadened
its applications from a simple learning tool to a device capable of handling complex tasks, truly living up to the mantra that “the possibilities are limited only by your imagination”.
The Raspberry Pi has become a cornerstone in the **
DIY Electronics** community, fostering a global network of innovators. For more insights into its impact, check out our articles in the Electronics Industry News category
.
🏠 Home Automation and Smart Home Hubs
Imagine a home that anticipates your needs, where lights dim automatically as you settle down
for a movie, or your coffee machine starts brewing before your alarm even goes off. With a Raspberry Pi, this isn’t science fiction; it’s a weekend project! The Raspberry Pi’s low power consumption, small footprint, and versatile
GPIO pins make it an ideal brain for your smart home.
Building a DIY Smart Home Controller
Why spend a fortune on proprietary smart home hubs when you can build your own, tailored precisely to your needs? We’ve guided
countless enthusiasts through this process, and the satisfaction of a self-built system is unparalleled. The Raspberry Pi, especially models like the Raspberry Pi 4 Model B, provides the computational power to run robust smart home software like **Home Assistant
** or OpenHAB. These platforms act as central controllers, allowing you to integrate devices from different manufacturers that might not otherwise “talk” to each other.
To get started, you’ll typically install your chosen smart home software onto
the Raspberry Pi’s microSD card. Then, you’ll configure it to discover and control your smart devices. It’s a journey of learning, but incredibly rewarding.
Table: Popular Smart Home Software for Raspberry Pi
| Software | Description | Key Features
to the Raspberry Pi. This will
allow you to control your lights, locks, and thermostats with a Raspberry Pi. It’s a rewarding project that gives you complete control over your home’s environment.
Automating Lights, Locks, and Thermostats
The
Raspberry Pi’s GPIO pins are the magic gateway to interacting with the physical world. For controlling lights, you can use smart light bulbs that integrate with Home Assistant (like Philips Hue or IKEA Tradfri) or connect relays to the GPIO pins to
control standard light switches. For locks, smart locks from brands like Yale or Schlage often have integrations. Thermostats like the Nest Learning Thermostat or ecobee Smart Thermostat can also be integrated
for intelligent climate control.
Our engineers love experimenting with different sensors and actuators. For instance, you could set up a motion sensor (connected to GPIO) to trigger lights when you enter a room, or use a temperature sensor to adjust your
thermostat automatically. The possibilities are truly endless!
Creating a Voice Assistant with Home Assistant
While commercial voice assistants like Amazon Alexa and Google Assistant are convenient, they come with privacy concerns. A Raspberry Pi allows you to build a private, local
voice assistant using Home Assistant. Projects like Rhasspy or Mycroft AI can be run on a Raspberry Pi, providing local voice control without sending your commands to the cloud.
We’ve found that combining a Raspberry Pi with
a good quality USB microphone (like the Blue Yeti Nano) and a speaker can create a surprisingly responsive and private voice interface for your smart home. This gives you the best of both worlds: convenience and privacy.
🎮 Retro Gaming Consoles and Emulation Stations
Who doesn’t love a trip down memory lane with classic video games? The Raspberry Pi is a **
retro gaming powerhouse** that can transform into a dedicated emulation station, bringing thousands of nostalgic titles from consoles like the NES, SNES, PlayStation 1, and arcade machines right to your living room. It’s one of the most popular
uses for the Raspberry Pi, and for good reason – it’s incredibly fun and relatively easy to set up!
Setting Up RetroPie and Lakka
The two most popular operating systems for turning your Raspberry Pi into a retro gaming console
are RetroPie and Lakka. Both are free, open-source, and come pre-configured with emulators for a vast array of systems.
- RetroPie: This is built on top of Raspberry Pi OS and uses
EmulationStation as its frontend. It offers a highly customizable experience, allowing you to tweak settings, add custom themes, and even run a desktop environment alongside your games. It’s fantastic for those who like to tinker.
Lakka:** Often called “RetroArch Linux,” Lakka is a lightweight operating system specifically designed to run RetroArch, a powerful frontend for emulators. It’s known for its simplicity, speed, and console-like user interface. If
you want a plug-and-play experience, Lakka is a great choice.
Our team at Why Pi™ often recommends RetroPie for beginners due to the wealth of online tutorials and community support. You’ll need a good quality microSD
card (we recommend SanDisk Extreme PRO cards for speed and reliability) and a USB gamepad (like the 8BitDo SN30 Pro+ or a classic Logitech F710).
Step
-by-Step: Installing RetroPie on your Raspberry Pi
-
Download: Go to the official RetroPie website and download the image file for your specific Raspberry Pi model.
-
Flash: Use a tool
like BalenaEtcher to write the RetroPie image to your microSD card. -
Boot: Insert the microSD card into your Raspberry Pi and power it on. It will automatically expand the filesystem and boot into EmulationStation.
-
Configure Controller: Follow the on-screen prompts to configure your gamepad.
-
Add ROMs: Transfer your game ROMs (legally acquired, of course!) to the appropriate folders on the Raspberry Pi via a
network share or USB drive. -
Play! Restart EmulationStation, and your games will appear, ready to play.
The Ultimate Handheld Gaming Device
Beyond the living room, the Raspberry Pi Zero
2 W or even a Raspberry Pi 3 A+ can be the heart of a DIY handheld retro gaming device. Projects like the Game Boy Zero or custom 3D-printed enclosures with integrated screens and buttons allow you to create a
portable gaming experience that rivals commercial handhelds. This is where the smaller form factor of some Raspberry Pi models truly shines. Imagine playing your favorite Game Boy Advance games on a custom-built device that fits in your pocket!
Multi-
Console Arcade Cabinets
For the truly ambitious, a Raspberry Pi can power a full-sized arcade cabinet. With a larger screen, authentic joysticks, and arcade buttons, you can recreate the classic arcade experience at home. The Raspberry Pi
4, with its enhanced processing power, can even handle more demanding arcade emulators like MAME with better performance. It’s a fantastic project for those with a passion for woodworking and electronics.
🖥️ Desktop Computing and Productivity Workstations
Can a Raspberry Pi replace your desktop computer? For many everyday tasks, the answer is a resounding yes! While it won’t be
rendering 4K videos or running the latest AAA games, a Raspberry Pi, particularly the Raspberry Pi 4 Model B with 4GB or 8GB RAM, is surprisingly capable as a lightweight desktop computing solution. It’
s a fantastic way to extend the life of an old monitor or set up an affordable workstation for students or those with basic computing needs.
Replacing Your Old Laptop for Web Browsing
Our engineers often use Raspberry Pis for secondary workstations.
For general web browsing, email, and document editing, the Raspberry Pi 4 performs remarkably well. Running Raspberry Pi OS (formerly Raspbian), a Debian-based Linux distribution, you get a familiar desktop environment with pre-installed applications like
the Chromium web browser, LibreOffice suite, and various programming tools.
We’ve found it’s perfect for:
- ✅ Browsing the web and consuming online content.
- ✅ Checking emails
and managing calendars. - ✅ Basic word processing and spreadsheet tasks.
- ✅ Video conferencing (with a USB webcam).
While it might not be as snappy as a high-end PC, for its size and cost, it’
s an incredibly efficient and energy-saving alternative.
Coding, Programming, and Learning Python
This is where the Raspberry Pi truly shines, living up to its “Pi” namesake! It’s an excellent platform for learning to
code, especially Python, which is pre-installed and deeply integrated into Raspberry Pi OS. The GPIO pins also make it perfect for physical computing, allowing you to write code that interacts directly with electronics like LEDs, sensors, and motors.
Many schools and universities use Raspberry Pis to teach programming and robotics. It’s an accessible way to get hands-on experience with:
- Python: Ideal for beginners and powerful enough for complex projects.
Scratch:** A visual programming language perfect for introducing kids to coding concepts.
- C/C++: For more advanced users and performance-critical applications.
- Web Development: Running local web servers and developing web
applications.
For anyone looking to dive into coding, a Raspberry Pi is an unbeatable starter kit. Check out our DIY Electronics section for project ideas!
Lightweight Office and Media Consumption
Beyond web browsing, the Raspberry Pi can handle a surprising amount of office work. LibreOffice provides a full suite of productivity tools compatible with Microsoft Office formats. For media consumption, it can play local video
files and even stream content from services like YouTube or Netflix (though performance can vary with higher resolutions).
One of our team members uses a Raspberry Pi 4 connected to a small monitor in their kitchen for recipes, music streaming, and quick web
searches. It’s a testament to its versatility as a secondary, always-on computer.
📡 Network Ad Blockers and Privacy Tools
Tired of intrusive ads tracking your every move online? Want to enhance your home network’s security and privacy without complex configurations? The Raspberry Pi is your unsung hero! Its ability to act as a dedicated, low-power server makes it perfect
for running services that protect your digital life.
Installing Pi-hole for Ad-Free Internet
This is arguably one of the most popular and impactful uses for a Raspberry Pi, and one we at Why Pi™ recommend to everyone! Pi
-hole is a network-wide ad blocker that runs on your Raspberry Pi. Once installed and configured as your network’s DNS server, it blocks ads, trackers, and malicious domains for every device connected to your home network –
smart TVs, phones, tablets, computers, you name it!
Benefits of Pi-hole:
- ✅ Ad-free browsing: Say goodbye to annoying pop-ups and banner ads.
- ✅ Enhanced
privacy: Blocks tracking domains, reducing your digital footprint. - ✅ Improved network performance: Less data downloaded means faster page loads.
- ✅ Malware protection: Blocks known malicious websites.
- ✅ Centralized
control: Manage ad blocking for your entire network from one dashboard.
The installation process is straightforward, often a single command line script. We’ve seen firsthand how Pi-hole transforms the online experience for our friends and family. It’s a set
-it-and-forget-it solution that provides immediate, tangible benefits.
👉 Shop Raspberry Pi for Pi-hole:
- Raspberry Pi 3 Model B+: Amazon | CanaKit Official
- Raspberry
Pi 4 Model B: Amazon | CanaKit Official - Raspberry Pi Zero 2 W: Amazon | Pimoroni Official
Securing Your Home Network with a Firewall
While Pi-hole handles blocking unwanted content, a Raspberry Pi
can also act as a basic firewall or router to further secure your network. By running distributions like OpenWrt or configuring iptables directly on Raspberry Pi OS, you can control inbound and outbound network
traffic, create VPN servers, and segment your network for improved security.
This is a more advanced project, but it offers unparalleled control over your network’s security posture. For instance, you could configure specific rules to block certain types of traffic or create
a dedicated guest Wi-Fi network that’s isolated from your main devices.
Running a Private DNS Server
Beyond Pi-hole’s ad-blocking capabilities, you can use a Raspberry Pi to run your own private DNS
server using tools like Unbound or DNSCrypt-Proxy. This allows you to:
- ✅ Encrypt your DNS queries: Preventing your ISP or others from seeing which websites you visit.
- ✅ Improve
privacy: Avoid relying on third-party DNS providers. - ✅ Speed up DNS resolution: By caching frequently visited domains locally.
Combining a private DNS server with Pi-hole creates a powerful privacy-focused network setup. It’s
a fantastic way to take back control of your internet experience.
📹 Media Centers and Streaming Servers
Transform your Raspberry Pi into the ultimate home entertainment hub! Forget
expensive dedicated media players; a Raspberry Pi can flawlessly handle your movies, TV shows, music, and photos, streaming them to any device in your home. It’s a cost-effective and highly customizable solution for media enthusiasts.
Building
a Plex or Jellyfin Server
This is a favorite among our team at Why Pi™! Imagine having all your personal media organized beautifully, with metadata, cover art, and even trailers, accessible from your smart TV, phone, tablet, or computer
, anywhere in the world. That’s what a Plex Media Server or Jellyfin (an open-source alternative to Plex) on a Raspberry Pi can do for you.
The Raspberry Pi
4 Model B is particularly well-suited for this task, especially the 4GB or 8GB RAM versions, thanks to its improved processing power and USB 3.0 ports for connecting external hard drives. While it might struggle with on
-the-fly 4K transcoding for multiple simultaneous streams, it excels at serving direct-play content.
Plex vs. Jellyfin on Raspberry Pi:
| Feature | Plex Media Server
Singly, the Raspberry Pi is a computer that fits in the palm of your hand. It’s a tiny powerhouse that can be used for so
much more than just a media center.
Kodi-Based Media Players
For those who prefer a dedicated media player experience without the server component, distributions like OSMC and LibreELEC turn your Raspberry Pi into
a full-fledged Kodi media center. Kodi is a free and open-source media player software application that allows you to play and view most streaming media, such as videos, music, podcasts, and images from local and network
storage media and the internet.
These distributions are highly optimized for the Raspberry Pi, offering a smooth and responsive user interface. They are perfect for:
- ✅ Playing local video and audio files.
- ✅ Streaming content from network
shares (NAS). - ✅ Accessing online content via various Kodi add-ons.
My colleague, an avid movie buff, uses a Raspberry Pi 3 B+ with LibreELEC connected to an old TV in his workshop
. It’s a simple, effective, and always-ready solution for background music or catching up on a show while he tinkers.
Transcoding and Streaming to Multiple Devices
While a single Raspberry Pi 4 can handle direct
-play streaming to a few devices, it’s important to understand its limitations, especially when it comes to transcoding. Transcoding is the process of converting a media file from one format to another on the fly, often necessary when
a client device doesn’t support the original file format or has limited bandwidth.
The Raspberry Pi’s CPU, while capable, isn’t designed for heavy, simultaneous video transcoding. If you plan to stream high-resolution content (e.g., 4K) that requires transcoding to multiple devices simultaneously, you might experience buffering or stuttering. However, for direct-play scenarios or lower-resolution content, it performs admirably.
Tips for optimal media streaming:
- Use direct play: Ensure your media files are in formats compatible with your client devices to avoid transcoding.
- Wired connection: Use an Ethernet cable for your Raspberry Pi for stable network performance.
External storage: Connect your media library via a fast USB 3.0 external hard drive.
🤖 Robotics, IoT, and Hardware Projects
This is where the Raspberry Pi truly becomes a maker’s dream! Its General Purpose Input/Output (GPIO) pins are the bridge between the digital world of code and the physical world of electronics. For anyone interested in DIY
Electronics or Electronic Component Reviews, the Raspberry Pi is an indispensable tool. It’s the brain behind countless robots, smart devices, and innovative hardware creations.
Controlling Robots and Drones
The Raspberry Pi’s compact size, processing
power, and ability to run a full Linux operating system make it an excellent choice for robotics projects. From simple line-following robots to complex robotic arms and even autonomous drones, the Pi can handle the control logic, sensor data processing
, and communication.
We’ve seen students at our workshops build incredible things:
- Wheeled Robots: Using motor drivers connected to GPIO pins, a Raspberry Pi can control DC motors for movement, coupled with ultrasonic sensors for obstacle avoidance
. - Robotic Arms: More complex projects involve controlling servo motors for precise arm movements, often programmed with Python libraries like
RPi.GPIOorgpiozero. - Drones: While building a full drone
from scratch is challenging, a Raspberry Pi can be integrated into larger drone platforms to handle tasks like image processing, autonomous navigation, or custom payload control.
The ability to write code in Python and directly manipulate hardware makes the Raspberry Pi an ideal platform for learning
and experimenting with mechatronics.
Environmental Monitoring and Weather Stations
Want to know the temperature, humidity, air pressure, or even air quality in your home or garden? A Raspberry Pi, combined with various sensors, can become
a sophisticated environmental monitoring station. These projects are not only educational but also incredibly useful.
Common sensors for environmental monitoring:
- DHT11/DHT22: For temperature and humidity.
- BMP2
80/BME280: For temperature, humidity, and barometric pressure. - MQ-series gas sensors: For detecting various gases (e.g., CO, CO2, methane).
DS18B20: Waterproof temperature sensor, great for outdoor use.
Our lead engineer has a Raspberry Pi Zero W running a small weather station in his backyard, logging data to a cloud service and even sending him alerts if
the temperature drops too low. It’s a fantastic example of a practical IoT application.
Smart Agriculture and Hydroponics Systems
Taking environmental monitoring a step further, the Raspberry Pi is making waves in smart agriculture. For hobby gardeners
and small-scale farmers, it can automate tasks and provide crucial data for optimizing plant growth.
- Automated Watering Systems: Soil moisture sensors connected to a Raspberry Pi can trigger pumps to water plants only when needed, conserving water.
Hydroponics Control: For hydroponic setups, a Raspberry Pi can monitor pH levels, nutrient concentrations, and water temperature, adjusting pumps and dosing systems automatically.
- Greenhouse Automation: Control fans, vents, and lighting
based on temperature, humidity, and light levels, creating optimal growing conditions.
These projects demonstrate the Raspberry Pi’s potential to bring precision agriculture to the individual, making gardening more efficient and sustainable.
☁️ Cloud Storage and Personal Servers
In an age where data privacy and control are paramount, wouldn’t it be great to have your own personal cloud? The Raspberry Pi empowers
you to break free from commercial cloud services and host your own files, websites, and even email, all from the comfort of your home. It’s about regaining ownership of your digital life.
Setting Up a Private NAS
(Network Attached Storage)
One of the most popular and practical server applications for the Raspberry Pi is creating a Network Attached Storage (NAS) device. Instead of paying monthly fees for cloud storage, you can connect an external USB hard drive (or multiple drives) to your Raspberry Pi and turn it into a centralized file server accessible to all devices on your home network.
Software like OpenMediaVault or Nextcloud can be installed on your Raspberry Pi to provide a user-friendly
interface for managing your files, setting up user accounts, and even syncing files across devices.
Benefits of a Raspberry Pi NAS:
- ✅ Data Privacy: Your data stays on your hardware, under your control.
- ✅
No Subscription Fees: A one-time hardware cost, then free to use. - ✅ Customization: Tailor your storage solution exactly to your needs.
- ✅ Backup Solution: A reliable local backup for your important
files.
We recommend using a Raspberry Pi 4 Model B for a NAS due to its Gigabit Ethernet port and USB 3.0 ports, which provide faster data transfer speeds. Pair it with a reliable external hard drive like
a Western Digital Elements Desktop Hard Drive or a Seagate Expansion Desktop Hard Drive.
👉 Shop Hard Drives for NAS:
- Western Digital Elements Desktop Hard Drive: Amazon | Walmart
- Seagate Expansion
Desktop Hard Drive: Amazon | Walmart
Running Your Own Web Server and Blog
Ever dreamed of hosting your own website or blog without relying on external hosting providers? A Raspberry Pi can serve as a perfectly capable **web server
** for personal websites, small blogs, or development environments. You can install popular web server software like Apache or Nginx, along with a database like MySQL or PostgreSQL, and a scripting language like **PHP
** or Python (Flask/Django).
This “LAMP” or “LEMP” stack (Linux, Apache/Nginx, MySQL, PHP/Python) transforms your Pi into a full-fledged hosting platform. It’s a fantastic
learning experience for anyone interested in web development and server administration. Our own early versions of the Why Pi™ blog were prototyped on a Raspberry Pi!
Self-Hosted Email and File Sharing
Beyond web hosting, the Raspberry Pi can handle
even more personal server tasks. While setting up a robust, secure, and reliable email server is a significant undertaking (and often not recommended for beginners due to spam blacklisting issues), it is technically possible.
More practically, you
can use your Raspberry Pi for secure file sharing within your local network or even over the internet (with proper security measures like VPNs and strong passwords). Tools like Samba allow you to share files with Windows, macOS, and Linux
clients, while SFTP provides secure file transfer over SSH. Combined with Nextcloud, you get a powerful, self-hosted file synchronization and sharing solution that rivals services like Dropbox or Google Drive.
🎓 Education, STEM, and Coding for Kids
The Raspberry Pi was born out of an educational mission, and it continues to be a cornerstone for STEM (Science, Technology, Engineering, and Mathematics) education worldwide. It’s an accessible, affordable, and engaging tool for students of all ages to learn about computing, programming, and electronics. Here at Why Pi™, we believe in fostering curiosity, and the Raspberry
Pi is a perfect catalyst for that!
Teaching Python and Scratch Programming
The Raspberry Pi comes pre-loaded with Python and Scratch, making it an ideal platform for teaching programming from elementary school to university levels.
- Scratch: This visual, block-based programming language is fantastic for introducing young children to computational thinking. They can drag and drop code blocks to create interactive stories, games, and animations, all while learning fundamental programming concepts without worrying
about syntax errors. - Python: As students progress, Python offers a powerful yet readable text-based language. It’s widely used in data science, web development, and artificial intelligence, making it a valuable skill. The Raspberry Pi’
s GPIO pins allow Python code to interact with physical components, bringing abstract programming concepts to life. Imagine writing a few lines of Python to make an LED blink or a motor spin – it’s incredibly motivating!
We’ve seen countless ”
aha!” moments in our workshops when kids realize their code can control real-world objects. It’s truly inspiring.
Electronics and Circuitry Experiments
The Raspberry Pi’s GPIO (General Purpose Input/Output) pins
are its secret weapon for hands-on electronics learning. These pins allow the Pi to send and receive electrical signals, enabling it to control and interact with a vast array of electronic components.
Students can learn about:
- Basic Circuits
: Connecting LEDs, resistors, and switches. - Sensors: Reading data from temperature, light, motion, and distance sensors.
- Actuators: Controlling motors, buzzers, and relays.
Digital vs. Analog: Understanding different types of signals.
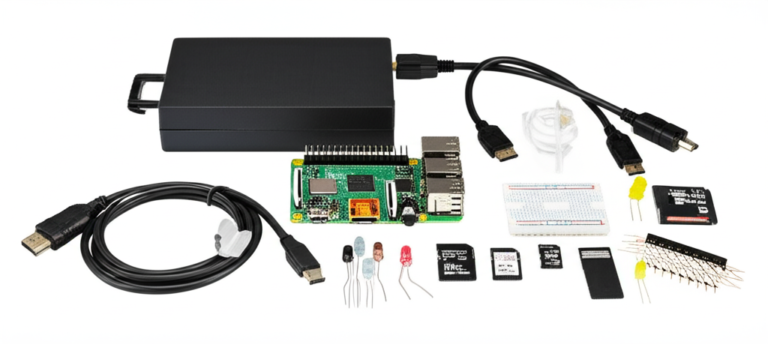
Using a breadboard, jumper wires, and a starter kit (like the CanaKit Raspberry Pi Starter Kit), beginners can quickly set up circuits and write simple Python scripts to control
them. This tactile learning experience is invaluable for understanding how computers interact with the physical world. For those looking for quality components, our Electronic Component Reviews section offers
expert advice.
👉 Shop Raspberry Pi Starter Kits:
- CanaKit Raspberry Pi 4 Starter Kit: Amazon | CanaKit Official
- Vilros Raspberry Pi 4 Basic Kit: Amazon | Vilros Official
Robotics Competitions and School Projects
The Raspberry Pi is a popular choice for robotics competitions and school science projects. Its combination of processing power, Linux flexibility, and GPIO capabilities makes it suitable for complex tasks.
Sumo Bots:** Building robots that autonomously push opponents out of an arena.
- Line Followers: Robots designed to follow a designated path.
- Environmental Monitors: Projects that collect data on air quality, temperature, or light
levels.
The Raspberry Pi Zero W and Raspberry Pi Zero 2 W are particularly favored for smaller, more embedded robotics projects due to their compact size and low power consumption. These projects not only teach technical skills but also foster
problem-solving, teamwork, and creative thinking.
🛡️ Cybersecurity Labs and Penetration Testing
For aspiring cybersecurity professionals, ethical hackers, or
even just those keen on understanding network vulnerabilities, the Raspberry Pi offers an incredibly affordable and portable platform for building a cybersecurity lab. It’s a safe sandbox to experiment with tools and techniques without risking your main computer or network.
Setting Up a Kali Linux Environment
One of the most common uses for a Raspberry Pi in cybersecurity is to install Kali Linux. Kali Linux is a Debian-derived Linux distribution designed for digital forensics and penetration testing. It comes pre-loaded
with hundreds of tools for various security tasks, including:
- Information Gathering: Nmap, Maltego
- Vulnerability Analysis: Nessus, OpenVAS
- Wireless Attacks: Aircrack-ng
, Kismet - Web Application Analysis: Burp Suite, OWASP ZAP
- Exploitation Tools: Metasploit Framework
While a Raspberry Pi won’t replace a high-end desktop for heavy
-duty penetration testing, it’s perfect for learning the basics, running lighter tools, and creating a portable hacking toolkit. The Raspberry Pi 4 Model B is the recommended model for Kali Linux due to its superior processing power and RAM
.
Network Traffic Analysis and Monitoring
A Raspberry Pi can be configured to act as a dedicated network monitor or packet sniffer. By connecting it to a network switch in promiscuous mode or using a dedicated network tap, you can capture
and analyze network traffic using tools like Wireshark or tcpdump.
This allows you to:
- ✅ Identify suspicious activity: Look for unusual connections or data transfers.
- ✅ Troubleshoot network issues
: Diagnose connectivity problems. - ✅ Understand network protocols: Learn how data moves across the network.
It’s a fantastic educational tool for understanding the underlying mechanics of network communication and identifying potential security weaknesses.
Ethical Hacking
Practice Grounds
Beyond running Kali Linux, a Raspberry Pi can be used to set up vulnerable target systems for ethical hacking practice. You could deploy intentionally insecure web applications (like OWASP Juice Shop) or vulnerable virtual machines on a
Raspberry Pi to practice your penetration testing skills in a controlled environment.
This “capture the flag” style learning is invaluable for developing practical cybersecurity skills. It allows you to safely explore attack vectors and defense mechanisms, making the Raspberry Pi an essential
tool for any budding cybersecurity expert.
🖨️ 3D Printing and CNC Control
The world of digital fabrication has been profoundly
impacted by the Raspberry Pi. From remotely controlling your 3D printer to acting as the brain for CNC machines, this tiny computer offers unparalleled flexibility and control for makers and hobbyists.
OctoPrint for Remote
3D Printing
If you own a 3D printer, then OctoPrint running on a Raspberry Pi is a game-changer. OctoPrint is a free, open-source web interface that allows you to remotely control and
monitor almost any FDM 3D printer. It’s one of the most popular Raspberry Pi projects for 3D printer owners, and for good reason!
With OctoPrint, you can:
- ✅ **
Start and stop prints remotely:** From anywhere with an internet connection. - ✅ Monitor print progress: Via a webcam connected to the Raspberry Pi.
- ✅ Upload G-code files: Directly to your printer without needing
an SD card. - ✅ Control printer settings: Adjust temperatures, speeds, and more on the fly.
- ✅ Receive notifications: Get alerts when prints finish or fail.
- ✅ Install plugins: Extend
functionality with features like spaghetti detection or time-lapse videos.
We’ve seen how OctoPrint dramatically improves the 3D printing workflow, saving countless trips to the printer and providing peace of mind. The Raspberry Pi 3
Model B+ or Raspberry Pi 4 Model B are excellent choices for running OctoPrint, providing enough processing power for smooth operation and webcam streaming.
👉 Shop Raspberry Pi for OctoPrint:
- Raspberry Pi
3 Model B+: Amazon | CanaKit Official - Raspberry Pi 4 Model B: Amazon | CanaKit Official
Controlling CNC Machines and Laser Cutters
Beyond 3D printing, the Raspberry Pi can also be integrated
into CNC (Computer Numerical Control) machines and laser cutters. While dedicated controllers often exist, a Raspberry Pi can offer a more flexible and open-source control solution, especially for DIY or custom-built machines.
Software like **
GRBL** (for G-code interpretation) or LinuxCNC (a more robust, real-time control system) can be adapted to run on a Raspberry Pi, allowing it to interpret design files and translate them into precise movements
of stepper motors. This is a more advanced application, often requiring additional hardware like motor drivers and control boards, but it opens up a world of possibilities for automated manufacturing at a hobbyist level.
Firmware Updates and Printer Monitoring
Even
if you don’t use OctoPrint for full control, a Raspberry Pi can be invaluable for firmware management and advanced monitoring of 3D printers. Many modern 3D printers, especially those running Klipper firmware, can
benefit from a Raspberry Pi acting as the host controller. Klipper offloads the computational load from the printer’s main board to the more powerful Raspberry Pi, allowing for faster, more precise movements and advanced features.
Furthermore, a Raspberry Pi
can run scripts to monitor printer temperatures, detect anomalies, and even trigger emergency shutdowns, adding an extra layer of safety and control to your fabrication projects. It’s all about leveraging the Pi’s processing power and connectivity to enhance your existing
tools.
📊 Data Science, Machine Learning, and AI
Can a tiny computer like the Raspberry Pi really handle the demanding tasks of data science
, machine learning (ML), and artificial intelligence (AI)? The answer is a resounding “yes,” with some caveats and specific use cases! While it won’t be training large language models, the Raspberry Pi is an excellent platform for edge
AI, prototyping ML applications, and learning the fundamentals of these cutting-edge fields.
Running TensorFlow and PyTorch Models
Thanks to optimized libraries and hardware acceleration (on some models), the Raspberry Pi can execute pre-trained machine learning models. Framework
s like TensorFlow Lite and PyTorch Mobile are specifically designed for resource-constrained devices like the Raspberry Pi.
This means you can:
- ✅ Perform image classification: Identify objects in real-time from
a camera feed. - ✅ Run object detection: Locate specific items within an image or video.
- ✅ Execute simple neural networks: For tasks like gesture recognition or voice command processing.
The Raspberry Pi
4 Model B is the best choice here, especially when paired with a Coral USB Accelerator (from Google). This accelerator provides dedicated hardware for neural network inference, dramatically speeding up ML tasks and allowing the Pi to handle more complex models with
impressive performance. It’s a fantastic way to experiment with edge computing and bring AI directly to your devices.
Image Recognition and Computer Vision Projects
One of the most popular AI applications on the Raspberry Pi is computer vision. With
a Raspberry Pi Camera Module (or a USB webcam), you can build projects that “see” and interpret the world around them.
- Security Cameras: Create smart surveillance systems that detect motion or recognize faces.
- Wildlife
Monitoring: Set up cameras to identify animals in your garden. - Quality Control: In small-scale manufacturing, use image recognition to check for defects.
- Smart Doorbells: Implement facial recognition to identify visitors
.
Our engineers have built a fascinating project using a Raspberry Pi Zero 2 W and a camera module to monitor bird feeders, automatically identifying different bird species using a pre-trained model. It’s a testament to the power of compact
, low-power AI at the edge.
Edge AI and Real-Time Data Processing
The true strength of the Raspberry Pi in AI lies in edge computing. This means performing computations directly on the device where the data is collected
, rather than sending everything to a distant cloud server.
Benefits of Edge AI on Raspberry Pi:
- ✅ Reduced Latency: Faster response times for real-time applications.
- ✅ Improved Privacy: Sensitive
data doesn’t leave the device. - ✅ Lower Bandwidth Usage: Only processed insights are sent to the cloud, not raw data.
- ✅ Offline Capability: Continues to function even without an internet connection.
This makes the Raspberry Pi ideal for applications where immediate decisions are needed, or where network connectivity is unreliable. Think smart sensors, autonomous robots, or intelligent security systems that react instantly to their environment. It’s a fascinating area of development,
and the Raspberry Pi is at its forefront.
🚀 Advanced Use Cases: Kubernetes Clusters and High-Performance Computing
For the
truly adventurous and technically proficient, the Raspberry Pi can be scaled up to tackle tasks traditionally reserved for more powerful servers. We’re talking about building Kubernetes clusters for container orchestration or even dabbling in high-performance computing (HPC). While a single Pi has its limits, combining multiple Pis can unlock surprising capabilities.
Building a Home Kubernetes Cluster
Kubernetes is an open-source system for automating deployment, scaling, and management of containerized applications. While
typically run on powerful servers, a cluster of Raspberry Pis can form a fantastic, low-cost, and energy-efficient home Kubernetes cluster. This is an excellent learning platform for DevOps engineers, developers, or anyone interested in cloud-native technologies.
You’ll need multiple Raspberry Pi 4 boards (the more, the merrier!), a good power supply for each, and a network switch. Each Pi acts as a node in the cluster, running a lightweight Kubernetes distribution like k
3s or MicroK8s.
Benefits of a Raspberry Pi Kubernetes Cluster:
- ✅ Learning Platform: Hands-on experience with container orchestration.
- ✅ Cost-Effective: Significantly cheaper than traditional server
hardware. - ✅ Low Power Consumption: Runs efficiently 24/7.
- ✅ High Availability: Distribute your applications across multiple nodes for redundancy.
- ✅ Experimentation: Deploy and manage your own micro
services.
Our senior engineers often use these clusters for testing new software deployments or running personal services that require high availability. It’s a mini data center in your home!
Distributed Computing and Rendering Farms
While not a supercomputer, a cluster
of Raspberry Pis can be leveraged for distributed computing tasks. This involves breaking down a large computational problem into smaller pieces that can be processed simultaneously by multiple Pis.
One classic example is building a rendering farm for 3D animation.
If you’re rendering complex scenes in software like Blender, you can configure multiple Raspberry Pis to each render a portion of the animation, significantly reducing overall rendering time. This concept extends to other computationally intensive tasks that can be parallelized.
It
‘s a testament to the idea that many small, affordable computers working together can achieve results that might otherwise require a single, much more expensive machine.
Load Balancing and Microservices Architecture
In a clustered environment, a Raspberry Pi can also act
as a load balancer. A load balancer distributes incoming network traffic across multiple servers (or in this case, multiple Raspberry Pis running different services) to ensure no single server becomes overwhelmed. This improves the responsiveness and availability of your applications.
Furthermore, a Raspberry Pi cluster is an ideal environment for experimenting with microservices architecture. Instead of building one large, monolithic application, you can break it down into smaller, independent services, each running on its own Raspberry Pi (or container within a Pi). This modular approach makes applications easier to develop, deploy, and scale. It’s a glimpse into how large-scale web services are built and managed.
🛠️ Troubleshooting, Power Supply, and Best Practices
Even the most seasoned Raspberry Pi enthusiast runs into a snag now and then. While the Pi is incredibly robust, understanding some common pitfalls and best practices can
save you a lot of headaches. Our team at Why Pi™ has collectively spent thousands of hours troubleshooting these little wonders, so let us share some wisdom!
Choosing the Right Power Adapter and SD Card
This is perhaps the most
critical piece of advice we can give you. Many Raspberry Pi issues, especially instability or unexpected reboots, can be traced back to an inadequate power supply or a faulty/slow microSD card.
- Power Adapter: Always use a
high-quality power adapter specifically designed for your Raspberry Pi model. - For Raspberry Pi 3 B/B+: A 5V 2.5A power supply is recommended.
- For Raspberry Pi 4
Model B: A 5.1V 3A USB-C power supply is essential. Undervoltage can cause significant performance issues and instability. Look for official Raspberry Pi power supplies or reputable brands like CanaKit
or Adafruit. - ❌ Don’t use phone chargers unless they explicitly meet the voltage and amperage requirements. They often can’t deliver sustained power.
- MicroSD Card: Your microSD card is the Raspberry
Pi’s hard drive, so its speed and reliability are paramount. - ✅ Invest in a reputable brand: SanDisk Extreme PRO, Samsung EVO Select, or Kingston Canvas Go! Plus are excellent
choices. - ✅ Choose a fast speed class: Class 10 or UHS-I Speed Class 3 (U3) are recommended for optimal performance.
- ❌ Avoid cheap, generic cards: They are
prone to corruption and slow speeds. - Size: 16GB is usually the minimum, but 32GB or 64GB provides more flexibility for projects.
A common issue we see is the “rainbow
square” or “lightning bolt” icon appearing on the screen, indicating undervoltage. This is your Pi telling you it’s not getting enough juice!
Cooling Solutions: Heatsinks and Fans
The Raspberry Pi,
especially the Raspberry Pi 4 Model B, can get quite warm under heavy load. While it’s designed to throttle its performance to prevent overheating, this can impact your project’s responsiveness.
- Heatsinks:
These are passive cooling devices that dissipate heat. They are a minimum recommendation for any Raspberry Pi 4. Many starter kits include them. - Fans: For more demanding applications or sustained high loads, an active cooling fan is highly recommended
. Small 5V fans can be easily connected to the GPIO pins. - Cases with Integrated Cooling: Many cases, like the Argon ONE M.2 Case or the **FLIRC Raspberry Pi 4 Case
**, offer excellent passive or active cooling solutions, often incorporating large heatsinks or integrated fans.
Table: Raspberry Pi Cooling Options
| Cooling Type | Description