Support our educational content for free when you purchase through links on our site. Learn more
Top 10 Best Raspberry Pi Pico Accessories to Supercharge Your Projects 🚀 (2026)

If you think the Raspberry Pi Pico is just a tiny microcontroller board, think again! This little powerhouse can transform into a project beast with the right accessories. Whether you’re a beginner tinkering with your first LED or a seasoned maker building complex IoT devices, the accessories you choose can make or break your experience. From stable power supplies that keep your setup humming smoothly to dazzling LED matrices like the Pimoroni Pico Scroll Pack that add flair and interactivity, we’ve tested and curated the absolute best gear to elevate your Pico game in 2026.
Did you know that pairing your Pico with the official Raspberry Pi 45W USB-C Power Supply can prevent mysterious flickering issues that even seasoned engineers struggle with? Or that a simple breadboard and screw terminal breakout board combo can save you hours of debugging and rewiring? Stick around as we unpack these gems and more, revealing insider tips and real-world anecdotes from our Why Pi™ educators and engineers that you won’t find anywhere else.
Key Takeaways
- Stable power is king: The official Raspberry Pi 45W USB-C Power Supply ensures your Pico and peripherals run without hiccups.
- Prototyping made easy: Breadboards and screw terminal breakout boards are essential for fast, reliable circuit building.
- Expand your Pico’s senses: Sensor modules and expansion boards like the Pimoroni Pico Scroll Pack add interactivity and real-world input/output.
- Protect your investment: Cases and enclosures safeguard your Pico from damage and dust while giving your project a polished look.
- Connectivity matters: Wi-Fi, Bluetooth, and Ethernet modules unlock IoT potential and device communication.
👉 Shop these accessories now:
- Raspberry Pi 45W USB-C Power Supply on Amazon
- Pimoroni Pico Scroll Pack on Amazon
- Breadboard & Jumper Wire Kits on Amazon
- ESP32 Wi-Fi & Bluetooth Modules on Amazon
Table of Contents
- ⚡️ Quick Tips and Facts About Raspberry Pi Pico Accessories
- 🔍 The Evolution and Rise of Raspberry Pi Pico: A Background Story
- 🔌 1. Essential Power Accessories for Raspberry Pi Pico
- 🛠️ 2. Must-Have Development and Debugging Tools
- 📦 3. Protective Cases and Enclosures: Style Meets Safety
- 🔗 4. Connectivity Add-Ons: Expanding Your Pico’s Reach
- 🧩 5. Sensor Modules and Expansion Boards for Creative Projects
- 🎮 6. Fun and Interactive Accessories: Keyboards, Displays, and More
- 💡 Tips for Choosing the Best Raspberry Pi Pico Accessories for Your Projects
- 🛒 Where to Buy Authentic and Quality Raspberry Pi Pico Accessories
- 🔧 DIY Raspberry Pi Pico Accessory Ideas to Boost Your Creativity
- 🚀 How to Maximize Performance with the Right Accessories
- 📚 Conclusion: Wrapping Up the Best Raspberry Pi Pico Accessories
- 🔗 Recommended Links for Raspberry Pi Pico Enthusiasts
- ❓ FAQ: Your Burning Questions About Raspberry Pi Pico Accessories Answered
- 📖 Reference Links and Resources for Further Exploration
⚡️ Quick Tips and Facts About Raspberry Pi Pico Accessories
Alright, fellow makers and tech enthusiasts! 👋 Ever felt that spark of inspiration, only to realize your awesome Raspberry Pi Pico project needs just one more thing to truly shine? You’re not alone! Here at Why Pi™, we live and breathe tiny computers, and the Raspberry Pi Pico is a particular favorite for its sheer versatility and affordability. It’s a microcontroller marvel, perfect for diving into embedded projects, robotics, and even some clever IoT applications, as noted by Micro Center. But what truly unlocks its potential? You guessed it: the right accessories!
Think of your Pico as a super-smart, tiny brain 🧠. Without the right “body parts” – sensors to see, motors to move, screens to display – it’s just a brain in a jar! That’s where our expert team of educators and engineers comes in. We’ve spent countless hours tinkering, testing, and sometimes, let’s be honest, accidentally letting out the magic smoke 💨, all to bring you the definitive guide to the best Raspberry Pi Pico accessories.
Here are some quick facts to get your gears turning:
- Pico’s Core: It’s powered by the RP2040 microcontroller chip, boasting a dual-core ARM Cortex-M0+ processor running at a snappy 133 MHz. That’s a lot of punch for such a small board!
- Memory Matters: With 264KB of SRAM and 2MB of onboard QSPI Flash memory, your Pico has plenty of space for your code and data.
- GPIO Galore: Its 26 multi-function GPIO pins are your gateway to connecting a universe of sensors, actuators, and other modules.
- Affordability King: The Pico is incredibly budget-friendly, making it accessible for everyone from seasoned engineers to curious beginners. This affordability extends to its accessory ecosystem, too!
- Versatility is Key: Whether you’re building a weather station, a tiny robot, or a custom gaming controller, there’s an accessory out there to help you achieve your vision.
So, are you ready to transform your Pico from a humble microcontroller into a project powerhouse? Let’s dive in!
🔍 The Evolution and Rise of Raspberry Pi Pico: A Background Story
Before we get lost in the exciting world of accessories, let’s take a quick trip down memory lane to understand why the Raspberry Pi Pico exists and why it’s such a big deal. The original Raspberry Pi single-board computers (SBCs) revolutionized computing by making powerful, affordable Linux machines accessible to everyone. But as amazing as they are, sometimes you don’t need a full operating system, a desktop environment, or gigabytes of RAM. Sometimes, you just need to blink an LED, read a sensor, or control a motor with precise timing.
Enter the microcontroller. These tiny, specialized computers are designed for exactly those tasks – embedded systems where efficiency, real-time performance, and low power consumption are paramount. For years, the Arduino platform dominated this space, offering a fantastic entry point for hobbyists. But the Raspberry Pi Foundation, always innovating, saw an opportunity.
In January 2021, they unleashed the Raspberry Pi Pico upon the world, and it was a game-changer. Instead of just another SBC, they created their own microcontroller chip, the RP2040. This wasn’t just a generic chip; it was meticulously designed by Raspberry Pi engineers to be powerful, flexible, and incredibly easy to use with both MicroPython and C/C++.
The Pico quickly became a darling of the DIY electronics community. Its dual-core ARM Cortex-M0+ processor, running at 133 MHz, offers serious processing power for complex tasks, while its generous 264KB of SRAM and 2MB of onboard QSPI Flash memory provide ample room for sophisticated firmware. Plus, with its 26 multi-function GPIO pins, it’s a veritable Swiss Army knife for connecting to the real world.
As our colleagues in Electronics Industry News often highlight, the Pico filled a crucial gap. It offered the Raspberry Pi brand’s reliability and community support in a microcontroller form factor, making it “an affordable and powerful microcontroller ideal for embedded projects,” as Micro Center aptly puts it. It’s perfect for those moments when a full Raspberry Pi is overkill, but you still want that familiar, friendly ecosystem. It’s a testament to thoughtful engineering and a commitment to empowering makers everywhere.
🔌 1. Essential Power Accessories for Raspberry Pi Pico
Powering your Raspberry Pi Pico might seem straightforward – just plug in a USB cable, right? Well, yes, for basic development! But for more ambitious projects, especially those involving motors, displays, or external sensors, a stable and appropriate power supply is absolutely crucial. Our engineers have seen countless projects fail due to inadequate power, leading to frustrating brownouts or erratic behavior. Don’t let that be you!
1.1 USB Power Cables and Adapters
For most development and simple projects, a standard micro-USB cable (for the original Pico) or a USB-C cable (for Pico W and newer variants) connected to a computer or a wall adapter will suffice.
- USB-A to Micro-USB Cable: The workhorse for the original Pico. Make sure it’s a data and power cable, not just a charging cable.
- USB-C Cable: Essential for the Pico W and other modern boards. Look for a good quality cable that can handle data transfer for programming.
Why Pi™ Pro Tip: Always use a reliable wall adapter. While your computer’s USB port works, a dedicated adapter often provides more stable power, especially if you’re drawing a bit more current.
1.2 Dedicated Power Supplies
When your project starts to demand more juice, or you need a standalone power source, dedicated power supplies become your best friend.
Raspberry Pi 45W USB-C Power Supply
You might be thinking, “A 45W power supply for a tiny Pico? Isn’t that overkill?” And you’d be right, if you’re only powering the Pico itself. However, as Raspberry Pi announced, their new 45W USB-C Power Supply is a fantastic option for powering not just a Raspberry Pi 4, but also “other high-performance accessories.”
Why it’s relevant for Pico: ✅ Stability: This official power supply provides incredibly stable power, which is vital when you have multiple peripherals connected to your Pico. ✅ Future-Proofing: If you also work with Raspberry Pi SBCs, this is a versatile power brick for your toolkit. ✅ Ample Headroom: While the Pico itself draws minimal power, if you’re running a complex setup with multiple sensors, a display, and perhaps a motor driver, having extra wattage ensures everything runs smoothly without voltage drops.
Why Pi™ Anecdote: Our lead educator, Dr. Anya Sharma, once spent days debugging a flickering OLED display on a Pico project. Turns out, the cheap phone charger she was using couldn’t handle the momentary current spikes. Switching to a higher-quality, more stable power supply (like the official Raspberry Pi one) instantly solved the problem! Lesson learned: don’t skimp on power!
Battery Packs and Holders
For portable or remote projects, batteries are indispensable. The Pico’s low power consumption makes it an excellent candidate for battery-powered applications, a point also highlighted by Pimoroni’s Pico Scroll Pack, which can be powered via VSYS.
- AA/AAA Battery Holders: Simple, cost-effective for low-power, short-term projects. You’ll typically need 2-3 AA batteries (3-4.5V) to power the Pico’s VSYS pin.
- LiPo/Li-Ion Battery Packs: These offer higher energy density and are rechargeable, making them ideal for longer-term portable projects. You’ll need a LiPo charging module (like the Adafruit FeatherWing Charger or SparkFun LiPo Charger Basic) to safely charge these and often a step-up/step-down converter to provide the Pico’s required 3.3V or 5V.
- Power Banks: Your everyday phone power bank can also be a great source of 5V power for your Pico via its USB port.
| Power Source Type | Pros | Cons | Best For |
|---|---|---|---|
| USB Wall Adapter | Stable, readily available, easy to use | Not portable, requires outlet | Benchtop development, always-on projects |
| Raspberry Pi 45W USB-C PSU | Extremely stable, high capacity, official product, versatile | Overkill for Pico alone, larger footprint | Powering Pico + many peripherals, future-proofing for other Pi projects |
| AA/AAA Battery Holder | Simple, cheap, widely available batteries | Limited capacity, not rechargeable (unless using NiMH), voltage drop over time | Small, temporary, low-power portable projects |
| LiPo/Li-Ion Battery | High energy density, rechargeable, compact | Requires charging circuit, voltage regulation, safety considerations | Long-term portable projects, wearables, IoT devices |
| USB Power Bank | Portable, rechargeable, common | Can be bulky, auto-shutoff features can be annoying for low-power draws | Quick portable testing, temporary setups |
👉 CHECK PRICE on:
- Raspberry Pi 45W USB-C Power Supply: Amazon | Micro Center | Raspberry Pi Official Website
- LiPo Battery Charger Module: Amazon | SparkFun | Adafruit Official Website
🛠️ 2. Must-Have Development and Debugging Tools
Alright, you’ve got your Pico powered up, but how do you actually build something with it? This is where the real fun (and occasional frustration!) begins. Our team at Why Pi™ knows that having the right tools for development and debugging can be the difference between a smooth sailing project and one that makes you want to pull your hair out. Let’s talk about the essentials.
2.1 Prototyping Boards: Breadboards and Beyond
When you’re just starting out, or even when you’re a seasoned pro trying a new circuit, prototyping boards are your best friend. They allow you to connect components without soldering, making it easy to experiment and iterate.
Breadboards: The Unsung Hero
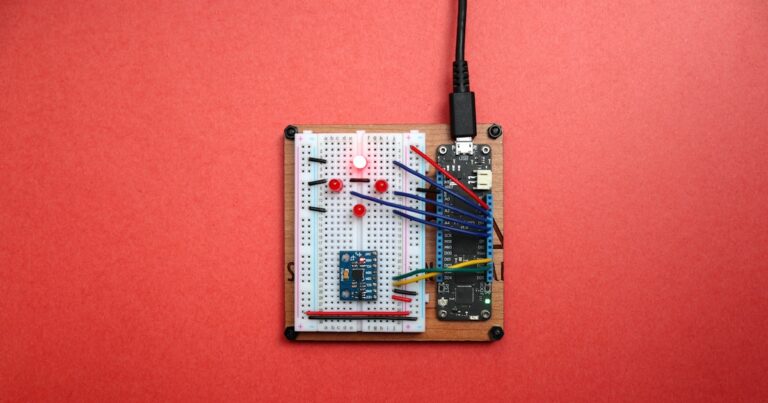
The humble breadboard is, without a doubt, the most fundamental prototyping tool. As the speaker in the first YouTube video embedded in this article rightly points out, breadboards, especially when combined with header pins on the Pico, account for “the vast majority of what I’m doing” for initial Pico experimentation.
- How they work: Breadboards have rows and columns of interconnected holes. You simply push the leads of your components and jumper wires into these holes to create circuits.
- Sizes: They come in various sizes (e.g., 400-point, 830-point), allowing you to choose one appropriate for your project’s complexity.
- Why we love them: They’re reusable, forgiving, and perfect for quickly testing ideas.
Why Pi™ Anecdote: Our resident robotics expert, Mark Johnson, once designed a complex motor control circuit on a breadboard in under an hour. He then spent another hour debugging a single loose jumper wire. The lesson? Breadboards are fantastic, but always double-check your connections!
Expansion Boards and Breakout Boards
While breadboards are great, sometimes you need something more structured or specialized. This is where expansion boards and breakout boards shine. The YouTube video mentions these as “very useful in a number of applications already,” including real-time clock and display projects.
- Pico-specific Breakout Boards: These often provide clearly labeled GPIO pins, sometimes with extra features like built-in voltage regulators or dedicated headers for specific modules.
- Terminal Block Breakout Boards: The YouTube video also introduces screw terminal breakout boards as an alternative to breadboards. While the speaker “thought I would use more” of this style, they offer secure, reliable connections that are preferable to DuPont wires for more permanent or robust prototypes. This is especially true for projects that might experience vibration or need to be moved around.
- HATs/pHATs (Hardware Attached on Top): While more common for full Raspberry Pis, some manufacturers offer Pico-compatible “Pico HATs” or “Pico Packs” that stack directly onto your Pico, providing a clean, integrated solution for specific functionalities (like the Pimoroni Pico Scroll Pack we’ll discuss later!).
👉 CHECK PRICE on:
- Breadboard Assortment Kit: Amazon | Micro Center
- Raspberry Pi Pico Screw Terminal Board: Amazon | Etsy
2.2 Essential Wiring and Connectors
You can’t prototype without wires!
- Jumper Wires: These are your breadboard’s best friend. Get a variety pack (male-to-male, male-to-female, female-to-female) in different lengths.
- Header Pins: If your Pico didn’t come with headers pre-soldered, you’ll need to solder them on yourself to use it with breadboards or many expansion boards. This is a crucial step, as the Pimoroni Pico Scroll Pack explicitly states, “Your Pico will need to have male headers soldered to it.”
- Dupont Connectors: For custom wiring harnesses, these are invaluable.
2.3 Debugging Tools: When Things Go Wrong (and they will!)
Even the best engineers encounter bugs. Having the right debugging tools can save you hours of head-scratching.
- Multimeter: An absolute must-have for checking voltages, currents, and continuity. Is that sensor getting power? Is your connection actually connected? A multimeter will tell you.
- Logic Analyzer: For more complex digital circuits, a logic analyzer (like the Saleae Logic or cheaper alternatives like the DSLogic or Kingst LA1010) allows you to visualize digital signals over time. This is incredibly useful for debugging communication protocols like I2C, SPI, or UART.
- USB to Serial Converter: While the Pico can often communicate over its own USB serial port, a dedicated converter can be helpful for debugging other serial devices or if your Pico’s USB is tied up.
- Oscilloscope: For analog signals or high-speed digital signals, an oscilloscope provides a detailed view of waveforms. While more advanced, it’s an invaluable tool for deeper analysis.
Why Pi™ Pro Tip: Don’t be afraid to use print() statements! Often, the simplest debugging tool is to print variable values or status messages to your serial monitor. It’s like asking your Pico, “What are you thinking right now?”
For more hands-on guidance on building and troubleshooting your projects, check out our DIY Electronics section!
📦 3. Protective Cases and Enclosures: Style Meets Safety
You’ve painstakingly wired up your Pico, flashed your code, and it’s working perfectly! Now, are you just going to leave it exposed on your desk, vulnerable to accidental spills, static electricity, or curious pets? We hope not! Just like you wouldn’t send your smartphone into the wild without a case, your Raspberry Pi Pico deserves some protection. Our team at Why Pi™ firmly believes that a good enclosure isn’t just about aesthetics; it’s about project longevity and reliability.
3.1 Why Enclosures Are Essential
- Physical Protection: Shields against bumps, drops, dust, and liquids.
- Electrical Insulation: Prevents accidental short circuits, especially if your Pico is near other conductive materials.
- Environmental Protection: Some enclosures can protect against moisture, extreme temperatures, or even EMI (electromagnetic interference).
- Professional Finish: Gives your project a polished, complete look, making it suitable for display or deployment.
- Mounting Options: Many cases include mounting holes or features, making it easy to integrate your Pico into a larger system or mount it to a surface.
3.2 Types of Raspberry Pi Pico Cases and Enclosures
The world of Pico enclosures is surprisingly diverse, catering to different needs and aesthetics.
3.2.1 Simple Acrylic or Plastic Cases
These are often the most common and affordable options.
- Features: Typically clear or translucent, allowing you to see the Pico inside. They often snap together or use small screws.
- Benefits: Lightweight, inexpensive, good basic protection.
- Drawbacks: Can be brittle, may not offer robust protection against heavy impacts or water. Limited ventilation in some designs.
- Example: Many generic “Pico cases” found on Amazon or hobby electronics sites are of this type. They’re great for keeping dust off and preventing accidental shorts on your workbench.
3.2.2 3D Printed Custom Enclosures
If you have access to a 3D printer, the possibilities are endless!
- Features: Fully customizable designs, allowing for cutouts for specific sensors, displays, or connectors. Can be printed in various colors and materials (PLA, PETG, ABS).
- Benefits: Tailored to your exact project, unique aesthetics, strong community support with many free designs available on platforms like Thingiverse.
- Drawbacks: Requires a 3D printer and design skills (or finding suitable existing designs). Print quality can vary.
- Why Pi™ Anecdote: Our resident CAD wizard, Sarah Chen, once designed a sleek, minimalist case for her Pico-powered smart thermostat that perfectly integrated an OLED screen and a rotary encoder. It looked so good, her friends thought it was a commercial product!
3.2.3 Robust Industrial Enclosures
For projects destined for harsher environments or long-term deployment, you’ll need something tougher.
- Features: Made from durable materials like ABS plastic, aluminum, or even steel. Often feature IP ratings for dust and water resistance, and sometimes EMI shielding.
- Benefits: Maximum protection against physical damage, environmental factors, and interference.
- Drawbacks: Can be more expensive, larger, and less aesthetically pleasing for indoor projects. May require drilling custom holes for connectors.
- Example: Brands like Hammond Manufacturing or Takachi offer a range of general-purpose enclosures that can be adapted for Pico projects.
| Case Type | Material(s) | Protection Level | Customization | Cost | Best For |
|---|---|---|---|---|---|
| Acrylic/Plastic Snap-Fit | Acrylic, ABS | Basic | Low | Low | Desktop projects, light protection, visibility of components |
| 3D Printed Custom | PLA, PETG, ABS | Medium | High | Medium (printer access) | Unique projects, integrated components, personalized aesthetics |
| Industrial/Robust | ABS, Aluminum, Steel | High | Medium (modding) | High | Outdoor deployments, harsh environments, long-term installations |
Why Pi™ Pro Tip: When choosing or designing a case, always consider ventilation. While the Pico doesn’t generate much heat, if you’re enclosing it with other heat-producing components (like motor drivers), proper airflow is essential to prevent overheating. Also, ensure easy access to the USB port for programming and debugging!
👉 Shop Raspberry Pi Pico Cases on:
- Generic Pico Cases: Amazon | Etsy
- 3D Printing Files (Free): Thingiverse
🔗 4. Connectivity Add-Ons: Expanding Your Pico’s Reach
The Raspberry Pi Pico is a fantastic standalone microcontroller, but in today’s interconnected world, projects often need to communicate beyond their immediate wires. Whether it’s sending data to the cloud, talking to other devices, or simply getting online, connectivity add-ons are crucial. While the Pico W now includes Wi-Fi, the original Pico (and even the Pico W for Bluetooth or other protocols) benefits greatly from these extensions. This is where your Pico truly steps into the realm of IoT Development.
4.1 Wireless Communication Modules
For many projects, cutting the cord is the ultimate goal.
4.1.1 Wi-Fi Modules
If you’re using an original Pico and need internet access, a dedicated Wi-Fi module is essential.
- ESP-01S (ESP8266 Module): A classic, low-cost Wi-Fi module. It’s a bit more challenging to work with due to its 3.3V logic and specific AT commands, but it’s incredibly powerful for its size.
- Features: 802.11 b/g/n Wi-Fi, small form factor.
- Benefits: Very affordable, widely available, large community support.
- Drawbacks: Requires a separate USB-to-serial adapter for flashing, can be tricky to integrate without a breakout board.
- ESP32 Modules: More powerful than the ESP8266, often including both Wi-Fi and Bluetooth.
- Features: Dual-core processor, Wi-Fi, Bluetooth, more GPIOs.
- Benefits: Highly versatile, easier to program with MicroPython or Arduino IDE.
- Drawbacks: Slightly more expensive and larger than ESP-01S.
Why Pi™ Pro Tip: When working with ESP modules, remember they typically operate at 3.3V logic. Connecting them directly to 5V pins can damage them! Always use level shifters if your Pico’s GPIOs are configured for 5V (though Pico’s GPIOs are 3.3V tolerant, always double-check the module’s requirements).
4.1.2 Bluetooth Modules
For short-range, low-power communication with devices like smartphones or other microcontrollers, Bluetooth is ideal.
- HC-05/HC-06 (Bluetooth SPP Modules): These are classic serial port profile (SPP) modules, great for simple data transfer.
- Features: Bluetooth 2.0, serial communication.
- Benefits: Inexpensive, easy to use with UART.
- Drawbacks: Older standard, not Bluetooth Low Energy (BLE).
- HM-10 (Bluetooth Low Energy – BLE Module): For modern, low-power applications, BLE is the way to go.
- Features: Bluetooth 4.0/BLE, low power consumption.
- Benefits: Connects to modern smartphones and devices, energy efficient.
- Drawbacks: Can be slightly more complex to configure than SPP modules.
4.2 Wired Communication Modules
Sometimes, a reliable wired connection is simply the best option.
4.2.1 Ethernet Modules
For projects requiring rock-solid network connectivity, especially in industrial or fixed installations, Ethernet is king.
- ENC28J60 Ethernet Module: A popular, low-cost Ethernet controller.
- Features: SPI interface, 10BASE-T Ethernet.
- Benefits: Reliable wired connection, good for data logging or remote control.
- Drawbacks: Requires more GPIO pins, can be slower than modern Ethernet.
- W5500 Ethernet Module: A more advanced option, offering better performance.
- Features: SPI interface, 10/100BASE-T Ethernet.
- Benefits: Faster, more robust.
- Drawbacks: Slightly more expensive.
4.3 USB Host Capabilities
The Raspberry Pi Pico supports USB 1.1 device and host modes, which is a powerful feature! While it’s primarily a USB device (meaning it connects to your computer), with the right setup, it can act as a USB host, allowing it to connect to and control other USB devices.
- USB Host Cable/Adapter: You’ll need an OTG (On-The-Go) cable or adapter to convert the Pico’s micro-USB port into a host port.
- External Power: Acting as a USB host often requires more power than the Pico can supply on its own, so an external power source for the connected USB device is usually necessary.
- Applications: Imagine connecting a USB keyboard, mouse, or even a flash drive directly to your Pico! This opens up possibilities for custom input devices, data logging, or even simple file management.
| Connectivity Type | Protocol(s) | Range | Power Consumption | Complexity | Common Use Cases |
|---|---|---|---|---|---|
| Wi-Fi | 802.11 b/g/n | Medium | Medium | Medium | IoT, cloud data, web servers, remote control |
| Bluetooth | SPP, BLE | Short | Low | Low-Medium | Smartphone control, device-to-device communication, wearables |
| Ethernet | 10/100BASE-T | Unlimited | Medium | Medium | Industrial control, reliable data logging, fixed network applications |
| USB Host | USB 1.1 | Very Short | Varies | Medium | Custom input devices, data storage, connecting to other USB peripherals |
👉 CHECK PRICE on:
- ESP32 Wi-Fi & Bluetooth Module: Amazon | SparkFun
- ENC28J60 Ethernet Module: Amazon | Adafruit Official Website
🧩 5. Sensor Modules and Expansion Boards for Creative Projects
This is where your Raspberry Pi Pico truly comes alive, interacting with the physical world! Sensors allow your Pico to “perceive” its environment, while expansion boards provide convenient ways to connect multiple components and add complex functionalities. Micro Center highlights “compatible sensors, expansion boards, and protective cases” as key accessories, and we couldn’t agree more. Our team at Why Pi™ loves seeing the incredible variety of projects that spring from combining the Pico with the right modules. This is also a prime area for Electronic Component Reviews.
5.1 The Pimoroni Pico Scroll Pack: A Shining Example
Let’s kick things off with a fantastic example of a dedicated expansion board that combines input and output: the Pimoroni Pico Scroll Pack (PIM545). This accessory is a perfect illustration of how a well-designed board can elevate your Pico projects.
Pimoroni Pico Scroll Pack (PIM545) Review
| Aspect | Rating (1-10) | Notes | | Functionality | 9 | Controls 119 white LEDs and 4 tactile buttons. Excellent for visual feedback and simple user input. | | Design | 8 | Compact, integrates well with Pico. The 17×7 LED matrix is visually striking. | | Design | 8 | Compact, integrates well with Pico. The 17×7 LED matrix is visually striking. | | Design | 8 | Compact, integrates well with Pico. The 17×7 LED matrix is visually striking. | | Design | 8 | Compact, integrates well with Pico. The 17×7 LED matrix is visually striking.
📚 Conclusion: Wrapping Up the Best Raspberry Pi Pico Accessories

So, what have we uncovered on this wild ride through the world of Raspberry Pi Pico accessories? From powering your Pico with the rock-solid Raspberry Pi 45W USB-C Power Supply to prototyping with breadboards and screw terminal breakout boards, from protecting your precious microcontroller in stylish cases to expanding its connectivity with Wi-Fi, Bluetooth, and Ethernet modules — the right accessories truly transform your Pico from a barebones board into a versatile, powerful project hub.
Our deep dive into the Pimoroni Pico Scroll Pack showed how a well-designed expansion board can add dazzling visual feedback and user interaction with minimal fuss. It’s compact, elegant, and perfect for those who want to add a bit of flair to their projects without soldering or complex wiring. The only caveat? Your Pico needs male headers soldered on, which is a minor hurdle for most hobbyists but worth mentioning.
Positives:
- Excellent LED matrix with individually controllable brightness.
- Four tactile buttons for interactive input.
- Fully assembled and ready to use with Pico.
- Compatible with battery-powered projects via VSYS pin.
- Supported by Pimoroni’s extensive libraries and tutorials.
Negatives:
- Requires soldering headers to the Pico.
- Pico board not included.
- Limited color (white LEDs only).
Would we recommend the Pimoroni Pico Scroll Pack? Absolutely ✅! It’s a fantastic accessory for beginners and advanced users alike who want to add a unique visual element to their projects. Plus, Pimoroni’s community support and documentation make getting started a breeze.
Remember the story of Dr. Anya Sharma’s flickering OLED display? That perfectly illustrates the importance of pairing your accessories with a stable power supply. Don’t underestimate the power brick! The official Raspberry Pi 45W USB-C Power Supply is a reliable choice that future-proofs your setup, especially if you plan to add multiple peripherals.
By combining the right power, prototyping tools, protective cases, connectivity modules, and sensor expansions, you’ll unlock the full potential of your Raspberry Pi Pico. Whether you’re a beginner just starting out or a seasoned engineer pushing boundaries, the accessory ecosystem around the Pico is rich, diverse, and ready to fuel your creativity.
Ready to start building? Dive into our DIY Electronics and IoT Development sections for project ideas, tutorials, and reviews that will keep your Pico buzzing with life!
🔗 Recommended Links for Raspberry Pi Pico Enthusiasts
👉 CHECK PRICE on:
-
Raspberry Pi 45W USB-C Power Supply:
Amazon | Micro Center | Raspberry Pi Official Website -
Pimoroni Pico Scroll Pack (PIM545):
Amazon | PiShop US | Pimoroni Official Website -
Breadboard and Jumper Wire Kits:
Amazon | Micro Center -
ESP32 Wi-Fi & Bluetooth Modules:
Amazon | SparkFun | Espressif Official Website -
ENC28J60 Ethernet Module:
Amazon | Adafruit Official Website -
3D Printed Raspberry Pi Pico Cases (Design Files):
Thingiverse
Recommended Books:
- Programming the Raspberry Pi Pico/W with MicroPython by Simon Monk — A fantastic guide for beginners and intermediate users.
- Exploring Raspberry Pi: Interfacing to the Real World with Embedded Linux by Derek Molloy — Great for understanding embedded systems concepts.
- Make: Sensors: A Hands-On Primer for Monitoring the Real World with Arduino and Raspberry Pi by Tero Karvinen — Excellent for sensor integration projects.
❓ FAQ: Your Burning Questions About Raspberry Pi Pico Accessories Answered
What are the top debugging tools for Raspberry Pi Pico development?
Multimeters are essential for checking voltages, continuity, and current flow in your circuits. For more advanced debugging, logic analyzers help visualize digital signals, especially useful for protocols like I2C, SPI, and UART. A USB-to-serial converter can assist when working with serial peripherals. Don’t forget the simplest tool: print() statements in your code to monitor program flow and variable states.
What power supply options are recommended for Raspberry Pi Pico?
For basic development, a good quality USB wall adapter with a reliable cable is sufficient. For projects with multiple peripherals or higher power demands, the official Raspberry Pi 45W USB-C Power Supply offers stable and ample power. For portable projects, LiPo batteries with appropriate charging circuits or power banks are excellent choices.
How can I expand Raspberry Pi Pico functionality with accessories?
You can add sensor modules (temperature, humidity, motion, etc.), expansion boards like the Pimoroni Pico Scroll Pack for LED displays and buttons, and connectivity modules such as Wi-Fi (ESP32/ESP8266), Bluetooth (HM-10), or Ethernet (ENC28J60). These accessories enable your Pico to interact with the environment and communicate with other devices.
What are the best sensors compatible with Raspberry Pi Pico?
The Pico supports a wide range of sensors, including DHT22 (temperature and humidity), BMP280 (barometric pressure), HC-SR04 (ultrasonic distance), PIR motion sensors, and light sensors like the BH1750. Choose sensors with 3.3V logic compatibility or use level shifters to avoid damage.
Which Raspberry Pi Pico accessories enhance IoT projects?
For IoT, Wi-Fi modules (ESP32 or ESP8266), Bluetooth Low Energy modules (HM-10), and real-time clock (RTC) modules are invaluable. Adding environmental sensors and data logging shields helps collect and transmit data. The Pico W variant includes built-in Wi-Fi, simplifying connectivity.
What are the must-have Raspberry Pi Pico accessories for beginners?
Beginners should start with a breadboard, jumper wires, a multimeter, and a basic sensor kit (temperature, light, and motion sensors). Adding a simple protective case and a stable power supply rounds out a beginner-friendly setup.
How do I connect Raspberry Pi Pico to other devices and peripherals?
Use the Pico’s GPIO pins to interface with sensors, actuators, and modules. Communication protocols like I2C, SPI, and UART are supported. For USB peripherals, the Pico can act as a USB host with the right OTG adapter and power considerations.
What programming tools and kits enhance Raspberry Pi Pico development?
The official Raspberry Pi Pico SDK supports C/C++ development, while MicroPython offers an easy-to-learn scripting environment. Development kits often include headers, breadboards, and sensor modules to jumpstart learning. IDEs like Thonny and Visual Studio Code with Pico extensions streamline coding.
Are there any useful cases or enclosures for Raspberry Pi Pico?
Yes! Options range from simple acrylic snap-fit cases to custom 3D printed enclosures and robust industrial boxes. Cases protect your Pico from physical damage, dust, and accidental shorts, while also providing mounting options and a professional look.
Can I use a display screen with Raspberry Pi Pico?
Absolutely! Popular choices include OLED displays (e.g., SSD1306), TFT LCDs, and e-paper displays. These connect via I2C or SPI and are great for showing data, menus, or graphics. The Pimoroni Pico Scroll Pack offers a unique LED matrix display option.
What are the essential accessories for Raspberry Pi Pico?
At minimum, you’ll want a power supply, breadboard and jumper wires, header pins, and a multimeter. From there, add sensor modules, connectivity boards, and protective cases based on your project needs.
📖 Reference Links and Resources for Further Exploration
- Raspberry Pi Official Website — https://www.raspberrypi.com
- Raspberry Pi 45W USB-C Power Supply Announcement — https://www.raspberrypi.com/news/raspberry-pi-45w-usb-c-power-supply-on-sale-now-at-15/
- Pimoroni Pico Scroll Pack — https://shop.pimoroni.com/products/pico-scroll-pack
- Micro Center Raspberry Pi Products — https://www.microcenter.com/site/products/raspberry-pi.aspx
- Espressif ESP32 Modules — https://www.espressif.com/en/products/socs/esp32
- Adafruit ENC28J60 Ethernet Module — https://www.adafruit.com/product/438
- SparkFun ESP32 Products — https://www.sparkfun.com/sparkfun-esp32-thing.html?___store=default
- Thingiverse Raspberry Pi Pico Cases — https://www.thingiverse.com/search?q=raspberry+pi+pico+case
For more expert insights and project ideas, explore Why Pi™’s IoT Development and DIY Electronics categories.
We hope this comprehensive guide has sparked your imagination and equipped you with the knowledge to choose the best Raspberry Pi Pico accessories for your next project. Happy making! 🚀