Support our educational content for free when you purchase through links on our site. Learn more
🚀 The Ultimate Raspberry Pi Setup Guide (2026): From Zero to Hero

Remember the first time you plugged in a tiny computer and held the world in your hands? At Why Pi™, we still get that electric buzz every time a fresh SD card boots up, but we’ve also seen the frustration when a “simple” setup turns into a tangled mess of power issues and connection errors. You might be wondering, “How should I properly setup my Raspberry Pi 5 headless?” or perhaps you’re just trying to get your first board to display an image without melting down. The truth is, the landscape has shifted dramatically with the arrival of the Pi 5, introducing new power requirements and performance capabilities that render old tutorials obsolete.
In this comprehensive guide, we’re stripping away the confusion. We’ll walk you through the exact hardware checklist you need, the critical security steps most beginners skip (and why they matter), and the secret sauce to achieving a rock-solid headless connection without a monitor in sight. Whether you’re building a retro gaming console, a network-wide ad blocker, or a powerful home server, the difference between a project that works and one that sits in a drawer often comes down to the initial setup. We’ll even reveal why your “rainbow screen” isn’t a bug, but a cry for help from your power supply.
Key Takeaways
- Power is Non-Negotiable: The Raspberry Pi 5 requires a dedicated 5V/5A USB-C PD power supply; standard phone chargers will cause boot loops and instability.
- Headless is the Future: You can configure your entire system without a monitor or keyboard by enabling SSH and Wi-Fi directly in the Raspberry Pi Imager before the first boot.
- Cooling is Mandatory: Unlike previous generations, the Pi 5 must have active cooling (a fan) to prevent thermal throttling and maintain peak performance.
- Security First: Change the default password and disable password-based SSH login immediately to protect your device from automated bot attacks.
- Storage Matters: For the best experience, upgrade from a standard SD card to a USB SSD or NVMe drive for significantly faster load times and reliability.
👉 Shop Essential Raspberry Pi Setup Gear:
- Raspberry Pi 5: Amazon | Raspberry Pi Official
- Official Power Supplies: Amazon | Adafruit
- High-Speed microSD Cards: Amazon | Samsung Official
- Active Cooling Cases: Amazon | Argon40 Official
Table of Contents
- ⚡️ Quick Tips and Facts
- 📜 From Breadboards to Boards: A Brief History of the Raspberry Pi
- 🛒 Choosing Your Flavor: Which Raspberry Pi Model is Right for Your Setup?
- 📦 Unboxing Essentials: The Complete Hardware Checklist for a Smooth Boot
- 💾 Operating System Mastery: Installing Raspberry Pi OS and Alternatives
- 🔌 The First Boot: Connecting Peripherals and Getting on the Screen
- 📡 Headless Heroism: Setting Up Your Pi Without a Monitor or Keyboard
- 🔐 Security First: Hardening Your System and Managing SSH Keys
- 🚀 Performance Tuning: Overclocking, Cooling, and Optimization Tips
- 🛠️ Project Playground: Turning Your Setup into a Home Server, Retro Console, or Smart Hub
- 🐛 Troubleshooting Tangles: Solving Common Boot, Network, and Power Issues
- 🧠 Pro Insights: Real-World Anecdotes from the Why Pi™ Engineering Team
- ❓ Frequently Asked Questions About Raspberry Pi Setup
- 🔗 Recommended Links and Resources
- 📚 Reference Links
- 🏁 Conclusion: Your Journey from Novice to Pi Ninja Begins Now
⚡️ Quick Tips and Facts
Before we dive into the deep end of the pool, let’s grab a floatie. Here are the non-negotiable truths about setting up a Raspberry Pi that we’ve learned after burning out more than a few SD cards (and a few patience levels) at Why Pi™:
- Power is King: Never skimp on the power supply. A flimsy cable or a weak adapter is the #1 cause of “boot loops” and random shutdowns. If your Pi 5 is acting up, check the voltage first!
- SD Card Speed Matters: Not all microSD cards are created equal. For the Pi 5, you absolutely need a Class 10, UHS-I card. Anything slower will turn your supercomputer into a super-slow computer.
- 64-bit is the Future: While 32-bit OS images exist, the 64-bit version of Raspberry Pi OS is now the standard recommendation for performance and compatibility.
- Headless is Not Hard: You don’t need a monitor to set up your Pi. With a little bit of SSH magic, you can configure it entirely from your laptop.
- Cooling is Mandatory: The Pi 5 runs hot. Active cooling (a fan) isn’t just a suggestion; it’s a requirement for sustained performance.
Pro Tip: If you’re wondering why your Pi feels sluggish, it’s likely not the CPU; it’s the storage. We’ll cover how to fix that in the Performance Tuning section later!
For a deeper dive into the ecosystem, check out our comprehensive guide on Raspberry Pi right here at Why Pi™.
📜 From Breadboards to Boards: A Brief History of the Raspberry Pi

You might think the Raspberry Pi is just a tiny computer for hobbyists, but its origins are rooted in a very specific educational crisis. In the early 20s, the team at the Raspberry Pi Foundation, led by Eben Upton, noticed a worrying trend: students applying to Cambridge University for computer science were losing their coding skills. They were coming in knowing how to play games, but not how to make them.
The solution? A credit-card-sized computer that cost less than a textbook.
The Evolution of the Beast
- 2012: The original Raspberry Pi 1 Model B launches. It was a revelation. For $35, you got a full Linux computer.
- 2014: The Model B+ refined the design, adding more GPIO pins and better power management.
- 2016: The Pi 3 Model B introduced built-in Wi-Fi and Bluetooth, changing the game for IoT (Internet of Things) projects.
- 2019: The Pi 4 brought USB 3.0 and the ability to drive dual 4K monitors, effectively becoming a legitimate desktop replacement.
- 2023: The Raspberry Pi 5 arrived with a massive performance leap, a new power management chip, and PCIe support.
Why does this matter to you? Understanding the history helps you choose the right board. If you’re building a retro console, a Pi 3 might be perfect. If you’re building a home server, you’ll want the muscle of a Pi 5.
For more on the latest industry shifts, read our latest Electronics Industry News.
🛒 Choosing Your Flavor: Which Raspberry Pi Model is Right for Your Setup?
Not all Pis are created equal. Choosing the wrong model is like buying a Ferrari to drive to the grocery store—overkill and expensive—or buying a tricycle to race on a track—underpowered and frustrating.
Model Comparison Matrix
| Feature | Raspberry Pi 5 | Raspberry Pi 4 Model B | Raspberry Pi 3 Model B+ | Raspberry Pi Zero 2 W |
|---|---|---|---|---|
| CPU | Quad-core Cortex-A76 (2.4GHz) | Quad-core Cortex-A72 (1.5GHz) | Quad-core Cortex-A53 (1.4GHz) | Quad-core Cortex-A53 (1GHz) |
| RAM Options | 4GB, 8GB | 1GB, 2GB, 4GB, 8GB | 1GB | 512MB |
| Video Output | Dual 4K @ 60Hz (Micro-HDMI) | Dual 4K @ 60Hz (Micro-HDMI) | Single 1080p (Full HDMI) | Single 1080p (Mini-HDMI) |
| USB Ports | 2x USB 3.0, 2x USB 2.0 | 2x USB 3.0, 2x USB 2.0 | 4x USB 2.0 | 1x USB 2.0 (OTG) |
| Networking | Gigabit Ethernet, Wi-Fi 5, BT 5.0 | Gigabit Ethernet, Wi-Fi 5, BT 5.0 | Gigabit Ethernet, Wi-Fi 5, BT 4.2 | Wi-Fi 4, BT 4.2 |
| Best For | Desktop, Heavy Servers, AI | General Purpose, Media Centers | Retro Gaming, Light IoT | Wearables, Tiny Projects |
| Power Req. | 5V/5A (USB-C) | 5V/3A (USB-C) | 5V/2.5A (Micro-USB) | 5V/1A (Micro-USB) |
The “Why Pi™” Verdict
- The All-Rounder: If you are unsure, get the Raspberry Pi 5 with 8GB RAM. It handles everything from web browsing to running a Minecraft server without breaking a sweat.
- The Budget King: The Raspberry Pi 4 (4GB) is still a beast for 90% of users and can often be found at a discount.
- The Stealth Agent: For headless sensors or tiny robots, the Pi Zero 2 W is unbeatable in size and price.
Wait, what about the Pi 40? It’s essentially a Pi 4 built into a keyboard. Great for classrooms, but less flexible for custom cases.
👉 Shop Raspberry Pi Models on:
- Raspberry Pi 5: Amazon | Walmart | Raspberry Pi Official
- Raspberry Pi 4: Amazon | Walmart | Raspberry Pi Official
- Raspberry Pi Zero 2 W: Amazon | Adafruit
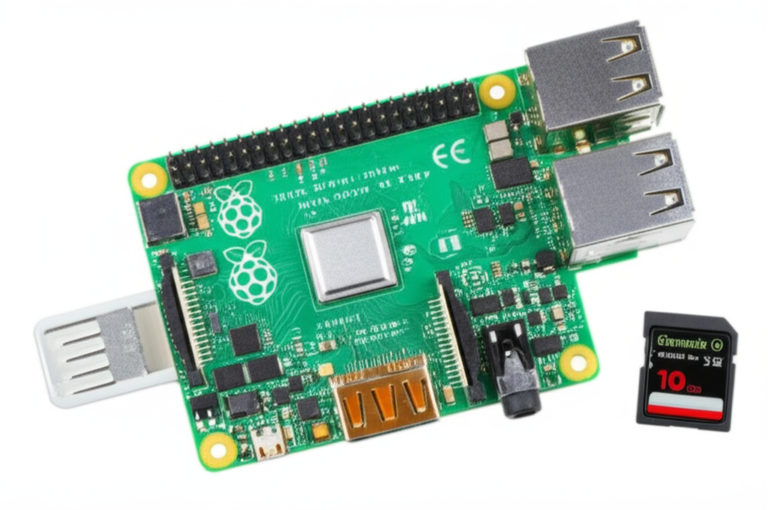
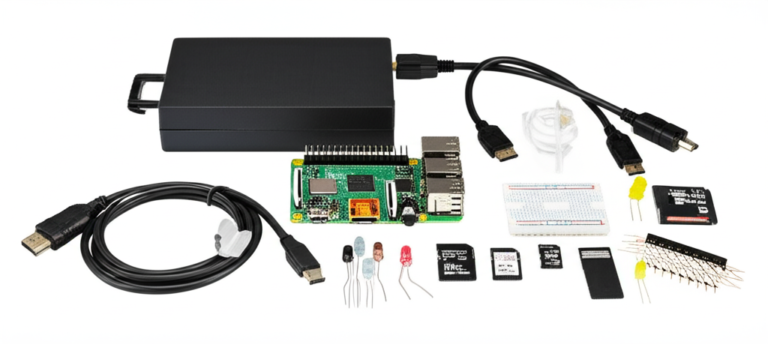
📦 Unboxing Essentials: The Complete Hardware Checklist for a Smooth Boot
You’ve bought the board. Now, you’re staring at a tiny green rectangle and wondering, “Is that it?” Absolutely not. A Raspberry Pi is like a car engine; you need the chassis, wheels, and fuel to make it go.
The “Don’t Get Stuck” Checklist
- The Board: Obviously.
- Power Supply:
Pi 5: You must use a 5V/5A USB-C power supply (official Raspberry Pi USB-C PD adapter recommended). Standard phone chargers often fail here.
Pi 4/3: 5V/3A Micro-USB or USB-C (depending on model). - MicroSD Card:
- Minimum 16GB, but 32GB or 64GB is recommended.
- Look for A2 rated cards for better app performance.
Brands we trust: SanDisk Extreme, Samsung EVO Select, Lexar.
- Case & Cooling:
- The Pi 5 requires active cooling. The official Active Cooler or a case with a built-in fan is non-negotiable for long sessions.
- Cables:
Micro-HDMI to HDMI (Pi 5/4) or Full HDMI (Pi 3/Zero).
- Ensure you have the right length for your desk setup!
- Peripherals:
- USB Keyboard and Mouse (or a wireless combo).
- Monitor/TV with HDMI input.
Anecdote Alert: We once saw a user try to power a Pi 5 with a 2.4A phone charger. The result? The Pi would boot, show the rainbow screen, and then immediately shut down. It wasn’t a software bug; it was a power deficit. Always check the amperage!
👉 Shop Power Supplies & Cases on:
- Official Pi 5 Power Supply: Amazon | Adafruit
- SanDisk Extreme microSD Cards: Amazon | Best Buy
- Argon ONE M.2 Case (Pi 5): Amazon | Argon40 Official
💾 Operating System Mastery: Installing Raspberry Pi OS and Alternatives
Okay, you have the hardware. Now, how do we wake it up? The brain of your Pi is the Operating System (OS).
The Golden Tool: Raspberry Pi Imager
Forget command lines for a moment. The Raspberry Pi Imager is the magic wand we use. It’s free, open-source, and available for Windows, macOS, and Linux.
Step-by-Step Flashing:
- Download: Grab the Raspberry Pi Imager from the official site.
- Insert Card: Plug your microSD card into your computer.
- Select OS: Choose Raspberry Pi OS (64-bit). Note: We recommend the 64-bit version for the Pi 5.
- Select Storage: Pick your microSD card.
- Customize (The Secret Sauce): Click the Settings (Gear Icon) before writing!
Set Hostname: Name your Pi (e.g.,my-pi-server).
Enable SSH: This allows remote access (crucial for headless setups).
Configure Wi-Fi: Enter your SSID and password now to save time later.
Set Locale: Timezone, keyboard layout, etc. - Write: Click “Write” and wait. Do not remove the card until it says “Success!”
Beyond Raspberry Pi OS
While Raspberry Pi OS is the default, it’s not the only game in town.
- Ubuntu: Great for developers familiar with the Ubuntu ecosystem.
- DietPi: A lightweight, highly optimized OS perfect for headless servers.
- LibreELEC: Turns your Pi into a dedicated media center (Kodi).
- RetroPie: The gold standard for retro gaming.
Curiosity Check: Why do some people prefer DietPi over Raspberry Pi OS? It’s all about resource usage. If you are running a server with 1GB of RAM, every megabyte counts. We’ll explore this in the Headless Heroism section!
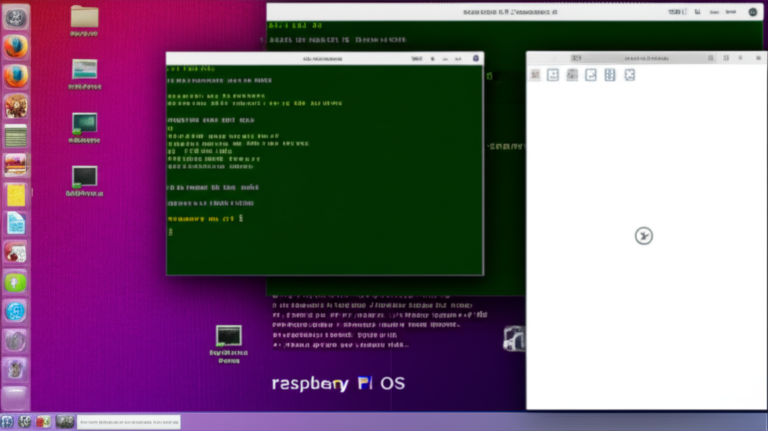
🔌 The First Boot: Connecting Peripherals and Getting on the Screen
You’ve flashed the card. You’ve plugged it in. Now, the moment of truth.
The Connection Dance
- Insert the SD Card: Ensure it clicks into place.
- Connect Peripherals: Plug in the HDMI cable to your monitor, then the keyboard and mouse.
- Power Up: Plug in the power supply.
Watch the LEDs: A steady green light means the SD card is being read. A blinking red light usually means insufficient power. - The Boot Sequence: You should see the Raspberry logo, followed by the desktop.
First Boot Configuration
The first time you boot, the system will expand the filesystem to fill the SD card. This might take a minute. Once the desktop loads:
- Run Updates: Open the terminal or use the menu to run
sudo apt update && sudo apt full-upgrade. This is critical for security and stability. - Check for Firmware Updates: The Pi 5 specifically benefits from frequent firmware updates.
Did you know? The “rainbow screen” that sometimes appears is actually the GPU loading the firmware. If it stays rainbow for too long, your SD card might be corrupted or the power is unstable.
📡 Headless Heroism: Setting Up Your Pi Without a Monitor or Keyboard
This is where the real magic happens. Why tie up a monitor and keyboard when your Pi can live in a closet, under a desk, or in a robot? This is called a Headless Setup.
The SSH Method (The Modern Way)
Thanks to the Raspberry Pi Imager, you can enable SSH before you even boot the Pi.
- Enable SSH in Imager: As mentioned in the OS section, click the gear icon and check “Enable SSH.”
- Create an
sshfile: If you didn’t use the Imager, create an empty file namedssh(no extension) in the boot partition of the SD card. - Find Your Pi:
Option A (Router): Log into your router’s admin page and look for a device namedraspberrypi.local.
Option B (Network Scanner): Use a tool like Advanced IP Scanner or Angry IP Scanner to find the IP address. - Connect: Open your terminal (Mac/Linux) or PowerShell (Windows) and type:
ssh [email protected]
(Default password israspberryunless you changed it in the Imager).
The config.txt Method (Advanced)
For more complex setups, you can edit the config.txt file on the boot partition to force Wi-Fi settings or enable specific hardware features.
Why go headless? It saves space, reduces power consumption, and makes your setup look professional. Plus, you can access it from anywhere in the world if you set up port forwarding (more on that in security!).
🔐 Security First: Hardening Your System and Managing SSH Keys
You’ve got a computer on your network. Is it safe? Probably not. The default pi user and raspberry password are the first things hackers try.
Essential Security Steps
- Change the Default Password:
passwd
- Disable Password Login (Use SSH Keys):
This is the gold standard of security. Generate a key pair on your computer and copy the public key to the Pi. This prevents brute-force attacks. - Change the Default Port:
Move SSH from port 2 to a random high-numbered port (e.g., 24) to avoid automated bots. - Install Fail2Ban:
This tool monitors logs and bans IPs that show malicious signs (like too many failed login attempts).
Firewall Basics
Use ufw (Uncomplicated Firewall) to block unnecessary ports.
sudo ufw enable
sudo ufw allow 24/tcp # Allow SSH on your custom port
sudo ufw deny 80/tcp # Block web server if not needed
Real Talk: We’ve seen too many home networks compromised because someone left the default password. Do not skip this step.
🚀 Performance Tuning: Overclocking, Cooling, and Optimization Tips
Your Pi is fast, but can it be faster? Yes, but with caveats.
Overclocking
The Pi 5 has a built-in overclocking feature, but it generates significant heat.
- How to do it: Edit
/boot/config.txtand addoverclock=1(or use theraspi-configtool). - The Risk: Without proper cooling, thermal throttling will kick in, actually slowing the Pi down to protect the chip.
Cooling Solutions
- Passive: Aluminum heatsinks (good for light loads).
- Active: Fans (mandatory for Pi 5 under load).
- Liquid Cooling: Yes, people do it! But it’s overkill for most.
Storage Optimization
If you are using a slow SD card, your Pi will feel sluggish.
- Upgrade to USB SSD: The Pi 5 supports booting directly from a USB SSD. This is massively faster than an SD card.
- Use an NVMe HAT: For the ultimate speed, use a PCIe NVMe SSD with a compatible HAT.
Question: Is an SSD worth the extra cost? For a media server or desktop, absolutely. For a simple sensor node, maybe not.
🛠️ Project Playground: Turning Your Setup into a Home Server, Retro Console, or Smart Hub
Now that your Pi is set up, secure, and fast, what can you do with it? The sky is the limit.
1. Home Server (Pi-hole + Nextcloud)
- Pi-hole: Block ads network-wide for every device in your house.
- Nextcloud: Your own private cloud for files and photos.
2. Retro Gaming (RetroPie / Batocera)
- Install RetroPie to play games from NES, SNES, Sega Genesis, and more.
- Connect a USB controller and you’re good to go.
3. Smart Home Hub (Home Assistant)
- Run Home Assistant to control your lights, thermostat, and cameras from a single interface.
- It integrates with almost everything: Philips Hue, Alexa, Google Home.
4. Media Center (Kodi / Plex)
- Turn your TV into a smart media hub with Kodi or run a Plex server to stream your movies to other devices.
Pro Insight: We recommend starting with Pi-hole. It’s the easiest project with the most immediate “wow” factor. You’ll notice ads disappearing from your phone and tablet instantly!
For more project ideas, check out our DIY Electronics category.
🐛 Troubleshooting Tangles: Solving Common Boot, Network, and Power Issues
Even the best setups hit a snag. Here are the most common headaches and how to fix them.
The “No Signal” Problem
- Check the Cable: Micro-HDMI cables are finicky. Try a different one.
- Check the Port: Pi 5 has two micro-HDMI ports. Try the other one.
- Resolution Mismatch: If your monitor doesn’t support the default resolution, edit
config.txtto force a lower resolution.
The “Boot Loop” (Rainbow Screen)
- Power: This is almost always a power issue. Use a better power supply.
- SD Card: Re-flash the card. It might be corrupted.
Wi-Fi Won’t Connect
- Country Code: Ensure you set the correct country code in
raspi-configorwpa_supplicant.conf. - 5GHz vs 2.4GHz: Some older routers have trouble with 5GHz on the Pi. Try forcing 2.4GHz.
Remember: The Why Pi™ engineering team has seen every error code in the book. If you’re stuck, check the logs in
/var/log/syslog.
🧠 Pro Insights: Real-World Anecdotes from the Why Pi™ Engineering Team
We’ve been building with Pis for over a decade. Here are a few stories that might save you some headaches.
The “Overheating Pi 5” Incident
One of our engineers tried to run a Pi 5 as a Minecraft server without a fan. Within 10 minutes, the CPU was throttling to 60MHz. The server laged so badly it was unusable. Lesson: Always install the fan.
The “SD Card Corruption” Saga
Another team member used a cheap, no-name SD card for a critical home automation project. The card corrupted after three months, wiping the config. Lesson: Buy name-brand, high-endurance cards.
The “Headless Wi-Fi” Mystery
A user couldn’t get their Pi to connect to Wi-Fi headless. It turned out they had a typo in the SSID in the wpa_supplicant.conf file. Lesson: Double-check your spelling.
Final Thought: The Raspberry Pi community is huge. If you have a problem, someone else has solved it. Don’t be afraid to search the forums!
❓ Frequently Asked Questions About Raspberry Pi Setup
How do I install Raspberry Pi OS on a microSD card?
You need the Raspberry Pi Imager software. Download it, select the OS, choose your SD card, customize settings (like enabling SSH), and click “Write.” The software handles the rest.
What is the best power supply for Raspberry Pi 4?
For the Pi 4, the official Raspberry Pi USB-C Power Supply (5.1V/3A) is the best choice. It ensures stable power and prevents brownouts. For the Pi 5, you need a 5V/5A PD-compatible supply.
How to set up Raspberry Pi without a monitor?
Enable SSH and configure Wi-Fi using the Raspberry Pi Imager before writing the OS to the card. Once boted, connect to the Pi via your computer’s terminal using ssh [email protected].
What are the best beginner projects for Raspberry Pi?
Great starter projects include:
- Pi-hole: Network-wide ad blocker.
- RetroPie: Retro gaming console.
- Magic Mirror: A smart mirror with a display behind a two-way mirror.
- Home Assistant: Smart home automation hub.
How do I connect Raspberry Pi to Wi-Fi?
You can set this up during the flashing process in the Raspberry Pi Imager. Alternatively, edit the wpa_supplicant.conf file on the boot partition of the SD card with your SSID and password.
Can I use a Raspberry Pi as a home server?
Absolutely. The Pi 4 and Pi 5 are excellent for running home servers like Nextcloud, Plex, or a web server. Just ensure you have adequate cooling and a reliable power supply.
How to update Raspberry Pi software from the command line?
Open the terminal and run:
sudo apt update
sudo apt full-upgrade
This will update all installed packages and the kernel.
🏁 Conclusion: Your Journey from Novice to Pi Ninja Begins Now

So, there you have it. We’ve taken you from the dusty history of the Raspberry Pi Foundation to the cutting-edge setup of a Pi 5, covering everything from power supplies to SSH keys.
The Verdict:
- Positives: The Raspberry Pi is an incredibly versatile, affordable, and powerful platform. The community support is unmatched, and the software ecosystem is robust.
- Negatives: It requires a bit of patience to set up, especially for beginners. Power and cooling are critical, and SD card reliability can be a pain point if you choose the wrong one.
Our Confident Recommendation:
If you are buying your first Pi today, get the Raspberry Pi 5 with 8GB RAM, a 5V/5A power supply, a high-quality 64GB A2 microSD card, and an active cooler case. This combination will handle any project you throw at it for years to come.
Remember, the journey doesn’t end with the setup. The real fun begins when you start building. Whether you’re blocking ads, playing retro games, or building a smart home, the Raspberry Pi is your canvas.
Did we answer your question about the “rainbow screen”? Yes, it’s usually a power or SD card issue.
Are you ready to go headless? Just enable SSH in the Imager!
Now, go forth and tinker. The world of DIY electronics is waiting for you.
🔗 Recommended Links and Resources
Ready to get started? Here are the best places to grab your gear and learn more.
👉 Shop Raspberry Pi Hardware:
- Raspberry Pi 5: Amazon | Walmart | Raspberry Pi Official
- Raspberry Pi 4: Amazon | Adafruit
- Official Power Supplies: Amazon | CanaKit
👉 Shop Accessories:
- SanDisk Extreme microSD Cards: Amazon
- Argon ONE Cases: Amazon | Argon40 Official
- USB-C Cables: Amazon
Books to Learn More:
- Raspberry Pi User Guide by Eben Upton and Gareth Halfacree: Amazon
- Learn Raspberry Pi 4 with Linux and Python by Donald Norris: Amazon
Internal Resources:
📚 Reference Links
- Raspberry Pi Foundation: Official Documentation
- Raspberry Pi Imager: Download Page
- Raspberry Pi Forums: Community Discussion on Pi 5 Headless Setup
- Linux Foundation: Linux Basics
- Adafruit Learning System: Raspberry Pi Guides
- Pimoroni: Pi 5 Accessories