Support our educational content for free when you purchase through links on our site. Learn more
How Do I Set Up a Raspberry Pi for the First Time? 🚀 (2026)
Setting up your very first Raspberry Pi can feel like stepping into a sci-fi movie — tiny, mysterious, and packed with endless possibilities. But fear not! Whether you’re a curious beginner or a seasoned tinkerer diving into your first Pi adventure, this guide from the educators and engineers at Why Pi™ will walk you through every step with clarity, wit, and expert advice.
Did you know the Raspberry Pi has sold over 40 million units worldwide since its launch? That’s a lot of creative projects, from home automation to retro gaming consoles! In this article, we’ll cover everything from choosing the perfect Pi model, flashing the OS onto your microSD card, connecting your hardware, to securing and customizing your setup. Plus, we’ll share troubleshooting tips and beginner-friendly projects to get your creativity flowing.
Curious about how to control your Pi remotely or which accessories are truly essential? We’ve got you covered. By the end, you’ll not only have your Raspberry Pi humming but also be ready to unleash its full potential.
Key Takeaways
- Choose the right Raspberry Pi model based on your project needs — Raspberry Pi 5 is the latest and most powerful.
- Use the official Raspberry Pi Imager tool to easily flash Raspberry Pi OS onto your microSD card.
- Connect your hardware in the right order: microSD card, peripherals, then power supply.
- Secure your Pi immediately by changing default passwords and enabling updates and firewalls.
- Enable SSH and VNC for convenient remote access without a monitor or keyboard.
- Explore beginner projects like LED blinking, retro gaming, and media centers to build confidence.
- Keep your Pi cool and updated for optimal performance and longevity.
Ready to dive deeper? Scroll down to discover detailed step-by-step instructions, expert tips, and insider tricks to make your Raspberry Pi journey smooth and exciting!
Table of Contents
- ⚡️ Quick Tips and Facts for Raspberry Pi Beginners
- 🔍 Understanding the Raspberry Pi: Origins and Evolution
- 🛒 Choosing the Right Raspberry Pi Model for Your Project
- 📦 What You Need: Essential Raspberry Pi Accessories and Peripherals
- 💾 Preparing Your MicroSD Card: Downloading and Installing Raspberry Pi OS
- 🔌 Step 1: Connecting Your Raspberry Pi Hardware for the First Time
- ⚙️ Step 2: Initial Boot and Basic Configuration Setup
- 🌐 Step 3: Setting Up Network and Internet Connectivity
- 🔒 Step 4: Performing Essential Security Setup and Updates
- 🖥️ Step 5: Installing Additional Software and Customizing Your Pi
- 📱 Remote Access: How to Control Your Raspberry Pi from Anywhere
- 🛠️ Troubleshooting Common Raspberry Pi Setup Issues
- 🎯 Best Beginner Projects to Try After Setup
- 💡 Tips and Tricks for Optimizing Raspberry Pi Performance
- 🔗 Recommended Links for Raspberry Pi Resources and Communities
- ❓ Frequently Asked Questions About Raspberry Pi Setup
- 📚 Reference Links and Further Reading
- 🏁 Conclusion: Your Raspberry Pi Journey Begins Here
⚡️ Quick Tips and Facts for Raspberry Pi Beginners
Welcome to the wonderful world of Raspberry Pi! If you’re just starting out, we at Why Pi™ know it can feel like stepping into a candy store with no idea where to begin. So, here are some quick tips and facts to get you off on the right foot:
- ✅ Start with the right model: Raspberry Pi 5 is the latest and fastest, perfect for most beginners and advanced projects alike. If you want something ultra-compact and low-power, consider the Raspberry Pi Zero 2 W.
- ✅ Use a quality microSD card: At least 32GB, Class 10 or UHS-1 for smooth performance. SanDisk Extreme or Samsung EVO Select are favorites.
- ✅ Official power supply matters: Use the official Raspberry Pi USB-C power supply (for Pi 4/5) to avoid undervoltage issues.
- ✅ Raspberry Pi OS is your friend: Formerly called Raspbian, it’s the official and most supported OS.
- ✅ Raspberry Pi Imager tool: This free software makes flashing your microSD card a breeze.
- ✅ Enable SSH early: For remote access without a monitor or keyboard.
- ✅ Backup your SD card: Once you have your setup just right, image your card to avoid starting over.
Fun fact: The Raspberry Pi was originally created to teach kids programming but quickly became a global favorite for hobbyists, educators, and even professionals. Curious about its origins? Keep reading! For more beginner insights, check out our Raspberry Pi beginner’s guide.
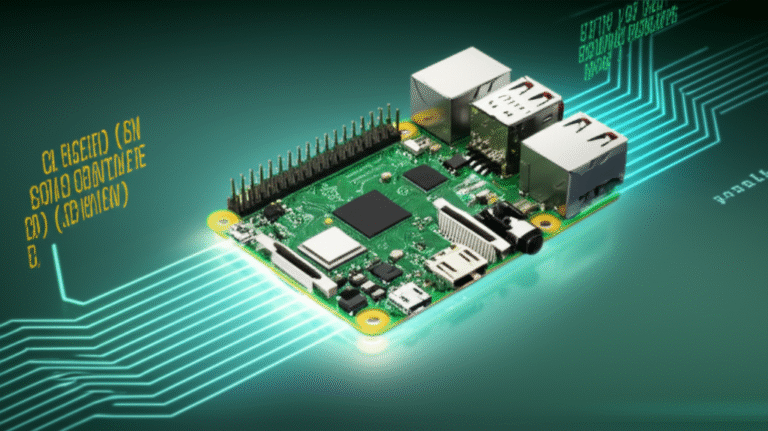
🔍 Understanding the Raspberry Pi: Origins and Evolution
The Raspberry Pi story is a fascinating journey from a humble educational tool to a global tech phenomenon. Here’s the scoop:
The Birth of Raspberry Pi
- Started in 2006 by the Raspberry Pi Foundation in the UK.
- The name “Raspberry” follows a quirky tradition of fruit-inspired computing companies (think Apple, BlackBerry).
- “Pi” nods to the Python programming language, a favorite for beginners.
Evolution Highlights
| Model | Release Year | Key Features | Why It Mattered |
|---|---|---|---|
| Raspberry Pi 1 | 2012 | 700 MHz CPU, 256MB RAM | Affordable, accessible computing |
| Raspberry Pi 2 | 2015 | Quad-core CPU, 1GB RAM | Big performance boost |
| Raspberry Pi 3 | 2016 | Wi-Fi and Bluetooth built-in | Wireless connectivity onboard |
| Raspberry Pi 4 | 2019 | Up to 8GB RAM, USB-C power, dual HDMI | Desktop-level performance |
| Raspberry Pi 5 | 2023 | Faster CPU, PCIe Gen 2, USB 3.0 | Best for power users and pros |
Why Pi Became a Hit
- Tiny, affordable, and versatile.
- Massive community and ecosystem.
- Perfect for IoT, robotics, media centers, and education.
Want to geek out more? The Raspberry Pi Foundation’s official history page is a treasure trove.
🛒 Choosing the Right Raspberry Pi Model for Your Project
Not all Pis are created equal! Picking the right model depends on your goals. Here’s our expert breakdown:
| Model | Best For | RAM Options | Connectivity | Power Supply Type |
|---|---|---|---|---|
| Raspberry Pi 5 | General purpose, power users | 2GB, 4GB, 8GB, 16GB | Wi-Fi 6, Bluetooth 5, Ethernet | USB-C (5V/3A) |
| Raspberry Pi 4 | Desktop replacement, media | 2GB, 4GB, 8GB | Wi-Fi 5, Bluetooth 5, Ethernet | USB-C (5V/3A) |
| Raspberry Pi 3 B+ | Learning, basic projects | 1GB | Wi-Fi 4, Bluetooth 4.2 | Micro USB (5V/2.5A) |
| Raspberry Pi Zero 2 W | Ultra-small, low power | 512MB | Wi-Fi 4, Bluetooth 4.2 | Micro USB (5V/2A) |
How to Choose?
- For beginners: Raspberry Pi 5 or 4 for ease and power.
- For portable or embedded projects: Pi Zero 2 W.
- For tight budgets: Older Pi 3 B+ still packs a punch.
Pro tip: If you want to experiment with robotics or sensors, make sure your model has enough GPIO pins and compatible interfaces. Dive deeper into hardware specs at the official Raspberry Pi products page.
📦 What You Need: Essential Raspberry Pi Accessories and Peripherals
Your Pi is just the start. Here’s what you’ll want to gather for a smooth first-time setup:
Must-Have Accessories
- MicroSD card: Minimum 32GB, Class 10 or better.
- Power supply: Official Raspberry Pi USB-C power supply (for Pi 4/5) or official micro USB for older models.
- HDMI cable: Standard or micro HDMI depending on your Pi model.
- Keyboard and mouse: Any USB or Bluetooth combo works.
- Monitor or TV: With HDMI input.
- Case: Protects your Pi; official cases are recommended.
Optional but Recommended
- Ethernet cable: For stable wired internet.
- USB hub: If you need more USB ports.
- Heat sinks or fan: To keep your Pi cool during heavy use.
- Camera module: For photography or security projects.
Our Favorite Brands
- SanDisk Extreme microSD cards: Reliable and fast.
- Official Raspberry Pi power supplies: Prevents power issues.
- Logitech K400 Plus Wireless Keyboard: Compact and convenient.
👉 CHECK PRICE on:
- SanDisk Extreme microSD cards: Amazon
- Official Raspberry Pi Power Supply: Amazon
- Logitech K400 Plus Wireless Keyboard: Amazon
💾 Preparing Your MicroSD Card: Downloading and Installing Raspberry Pi OS
This is the heart of your Pi’s operation — the OS on your microSD card. Let’s walk through it:
Step-by-Step: Using Raspberry Pi Imager
- Download Raspberry Pi Imager: Available for Windows, macOS, and Linux at the official Raspberry Pi site.
- Insert your microSD card into your computer’s card reader.
- Launch Raspberry Pi Imager.
- Choose OS: Select “Raspberry Pi OS (32-bit)” for most users.
- Choose Storage: Select your microSD card.
- Advanced options: Click the gear icon to pre-configure settings:
- Set hostname.
- Enable SSH for remote access.
- Configure Wi-Fi credentials.
- Set locale and keyboard layout.
- Write: Click “Write” and wait for the process to complete.
- Eject the card safely.
Why Use Raspberry Pi Imager?
- Simplifies OS installation.
- Allows pre-configuration for headless setups.
- Ensures you get the latest OS version.
Heads up: Always back up any important data on your microSD card before flashing — it will be wiped!
For a detailed walkthrough, check out the Raspberry Pi Foundation’s official guide.
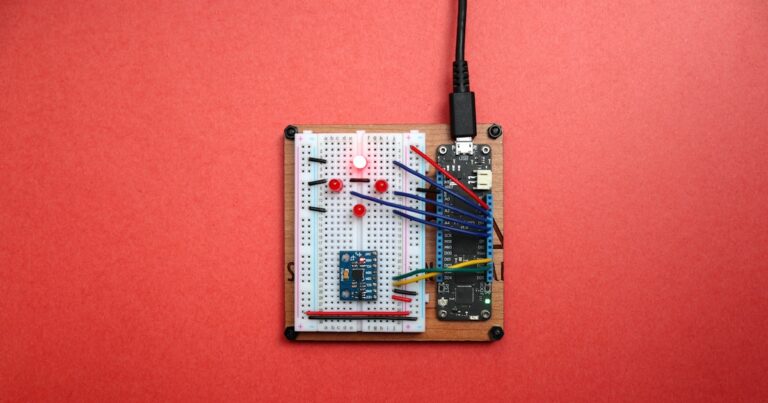
🔌 Step 1: Connecting Your Raspberry Pi Hardware for the First Time
Time to get hands-on! Here’s how to connect your Pi’s hardware for that first magical boot-up.
What You’ll Need
- Raspberry Pi board
- Prepared microSD card
- Power supply
- Monitor or TV with HDMI input
- Keyboard and mouse (USB or Bluetooth)
- Optional: Ethernet cable for wired internet
Connection Order
- Insert the microSD card into the slot on the underside of your Pi.
- Connect your keyboard and mouse to USB ports.
- Plug in the HDMI cable to your monitor and Pi.
- For Raspberry Pi 4/5, use the HDMI0 port (closest to power).
- Connect Ethernet cable if using wired internet.
- Attach the power supply last to avoid power surges.
- Switch on your monitor and power up your Pi.
What to Expect
- The Pi will perform a quick boot.
- You’ll see the Raspberry Pi OS splash screen.
- After a few moments, the desktop environment or setup wizard appears.
Pro tip: If your monitor stays black, double-check the HDMI connection and power supply. Sometimes a reboot helps.
⚙️ Step 2: Initial Boot and Basic Configuration Setup
Once your Pi boots, it’s time to make it yours!
First-Time Setup Wizard
- Welcome screen: Choose your language, country, and keyboard layout.
- Wi-Fi setup: Connect to your wireless network.
- Update software: The wizard will prompt you to update the OS — do it! This ensures you have the latest security patches and features.
- Change default password: For security, change the default “pi” user password.
- Screen configuration: Adjust resolution or overscan if needed.
Manual Configuration Tools
- Use
raspi-configin the terminal for advanced options: - Expand filesystem to use the full microSD card.
- Enable camera or SSH.
- Set locale, timezone, and keyboard.
Why This Matters
Proper initial setup ensures your Pi is secure, connected, and ready for your projects.
🌐 Step 3: Setting Up Network and Internet Connectivity
No Pi is an island! Let’s get you online.
Wired Connection
- Plug in an Ethernet cable.
- Your Pi should automatically get an IP address via DHCP.
- Test with
ping google.comin the terminal.
Wireless Connection
- Use the Wi-Fi setup wizard during initial boot.
- Alternatively, configure Wi-Fi via
raspi-configor by editingwpa_supplicant.confon the SD card. - For headless setups, pre-configure Wi-Fi in Raspberry Pi Imager’s advanced options.
Troubleshooting Network Issues
- Ensure your router’s SSID and password are correct.
- Check for MAC filtering on your router.
- Restart your Pi and router if needed.
For detailed networking tips, see our IoT Development category.
🔒 Step 4: Performing Essential Security Setup and Updates
Security is often overlooked but crucial. Here’s how to keep your Pi safe:
Change Default Credentials
- Default username is “pi” and password is “raspberry” — change them immediately.
- Use
passwdcommand to change the password.
Update and Upgrade
- Run:
sudo apt update
sudo apt full-upgrade -y
- This installs the latest security patches.
Enable Firewall
- Install
ufw(Uncomplicated Firewall):
sudo apt install ufw
sudo ufw enable
sudo ufw allow ssh
- This blocks unwanted incoming connections.
Disable Unused Services
- Turn off services you don’t need, e.g., VNC or Bluetooth if unused.
SSH Security
- Use SSH keys instead of passwords for remote login.
- Disable password authentication in
/etc/ssh/sshd_config.
Pro tip: Regularly check for updates and monitor your Pi’s logs for suspicious activity.
🖥️ Step 5: Installing Additional Software and Customizing Your Pi
Your Pi is a blank canvas — let’s paint it with tools and tweaks!
Must-Have Software for Beginners
- Chromium Browser: For web surfing.
- LibreOffice: Office suite for documents and spreadsheets.
- Python and Thony IDE: For coding projects.
- VLC Media Player: For multimedia.
- Node-RED: Visual programming for IoT projects.
Installing Software
Use the terminal:
sudo apt install <package-name>
``
Or use the Add/Remove Software GUI.

### Customization Tips

- Change desktop themes and wallpapers.
- Set up auto-login or kiosk mode for dedicated projects.
- Configure startup scripts for automation.

### Our Favorite Tools for Makers

- **GPIO Zero:** Python library to control hardware pins.
- **Home Assistant:** For smart home automation.
- **OctoPrint:** Control 3D printers remotely.

Explore more in our [DIY Electronics section](https://www.whypi.org/category/diy-electronics/).

---

## 📱 Remote Access: How to Control Your Raspberry Pi from Anywhere

Want to ditch the keyboard and monitor? Remote access is your friend.

### SSH Access

- Enable SSH via `raspi-config`.
- Connect from another computer using:
 ```bash
 ssh pi@<raspberrypi.local>
- For Windows, use PuTTY.
VNC (Graphical Remote Desktop)
- Enable VNC server on your Pi.
- Use RealVNC Viewer on your PC or mobile.
- Secure with strong passwords.
Raspberry Pi Connect (Cloud-Based)
- Official service to access your Pi remotely via the internet.
- Requires account setup and verification at connect.raspberrypi.com.
VPN and Port Forwarding
- For advanced users, set up VPN or port forwarding to access your Pi securely from anywhere.
Remote access lets you run projects headless, perfect for servers, media centers, or IoT devices.
🛠️ Troubleshooting Common Raspberry Pi Setup Issues
Even the best plans hit snags. Here’s how to troubleshoot:
| Issue | Possible Cause | Solution |
|---|---|---|
| No display on monitor | HDMI cable/port issue | Check cable, try HDMI0 port, reboot Pi |
| Pi won’t boot | Corupted SD card | Re-flash OS, use a different microSD card |
| Power LED blinking or off | Insufficient power supply | Use official power supply, check cable |
| Can’t connect to Wi-Fi | Wrong credentials or weak signal | Verify SSID/password, move closer to router |
| SSH connection refused | SSH not enabled | Enable SSH via raspi-config or pre-configure |
| Slow performance | Overheating or SD card speed | Add heatsinks/fan, use faster microSD card |
Pro tip: Keep a spare microSD card with a fresh OS image handy for quick recovery.
🎯 Best Beginner Projects to Try After Setup
Now that your Pi is up and running, why not dive into some fun projects?
Top Starter Projects
- LED Blink: Learn GPIO basics by blinking an LED using Python.
- Retro Gaming Console: Install RetroPie and relive classic games.
- Media Center: Use Kodi to stream movies and music.
- Home Security Camera: Set up MotionEyeOS for surveillance.
- Weather Station: Connect sensors to monitor temperature and humidity.
Why These Projects?
- They cover hardware and software fundamentals.
- Provide quick wins to boost confidence.
- Open doors to more complex builds.
For detailed tutorials, visit the Raspberry Pi Projects hub.
💡 Tips and Tricks for Optimizing Raspberry Pi Performance
Want your Pi to run like a dream? Here are some pro tips:
- Use a high-quality microSD card with fast read/write speeds.
- Keep your Pi cool with heatsinks or a fan.
- Disable unnecessary services to free up resources.
- Use wired Ethernet for stable network performance.
- Overclock cautiously if you need extra speed (and have adequate cooling).
- Regularly update your OS and software.
- Use lightweight desktop environments like LXDE or XFCE if performance lags.
🔗 Recommended Links for Raspberry Pi Resources and Communities
Stay connected and keep learning with these top resources:
- Raspberry Pi Official Website
- Raspberry Pi Documentation
- Raspberry Pi Forums
- Raspberry Pi Projects
- Why Pi™ Raspberry Pi Category
- Raspberry Pi Stack Exchange
- IoT Development on Why Pi™
❓ Frequently Asked Questions About Raspberry Pi Setup
What are common troubleshooting tips for first-time Raspberry Pi users?
- Check power supply and cables.
- Re-flash your microSD card if boot fails.
- Use official accessories to avoid compatibility issues.
- Verify network credentials.
- Consult forums and community resources.
How do I update and upgrade my Raspberry Pi after setup?
Run these commands in the terminal:
sudo apt update
sudo apt full-upgrade -y
``
This ensures your OS and software are current and secure.

### Can I use a Raspberry Pi without a monitor or keyboard?

✅ Yes! Use **headless mode** by enabling SSH and connecting remotely via another computer or smartphone.

### How do I connect my Raspberry Pi to Wi-Fi for the first time?

- During initial setup, use the setup wizard to select your Wi-Fi network and enter the password.
- For headless setups, pre-configure Wi-Fi in Raspberry Pi Imager’s advanced options or edit `wpa_supplicant.conf` on the SD card.

### What is the best power supply for a Raspberry Pi?

Use the **official Raspberry Pi USB-C power supply** for Pi 4/5 or the official micro USB power supply for older models. It ensures stable voltage and prevents undervoltage warnings.

### How do I install the Raspberry Pi OS on a microSD card?

Use the **Raspberry Pi Imager** tool to download and flash the OS onto your microSD card. It’s easy, fast, and supports pre-configuration.

### What accessories do I need to set up a Raspberry Pi initially?

- MicroSD card (32GB+)
- Official power supply
- HDMI cable
- Keyboard and mouse
- Monitor or TV

Optional: case, Ethernet cable, USB hub, cooling accessories.

### How do I ensure my Raspberry Pi is properly configured for remote access and security?

- Enable SSH and change default passwords.
- Use SSH keys for authentication.
- Enable firewall (`ufw`).
- Regularly update your system.
- Consider VPN for secure remote connections.

### What are some essential software packages to install on a new Raspberry Pi setup?

- Chromium browser
- Python and Thony IDE
- LibreOffice
- VLC media player
- GPIO Zero library for hardware control

### How do I connect my Raspberry Pi to a network and access the internet?

- Use Ethernet cable for wired connection.
- Use Wi-Fi setup wizard or pre-configure Wi-Fi credentials.
- Test connectivity with `ping` command.

### Can I use any keyboard and mouse with my Raspberry Pi, or are there specific requirements?

✅ Most USB or Bluetooth keyboards and mice work fine. Wireless combos like Logitech K400 Plus are popular for convenience.

### What are the basic components needed to set up a Raspberry Pi for the first time?

- Raspberry Pi board
- MicroSD card with OS
- Power supply
- Display (monitor or TV)
- Keyboard and mouse

---

# featured-video
Don’t miss the [first YouTube video](#featured-video) embedded in this article, where the Raspberry Pi’s creator walks you through the basics, including the Pi’s ports, the NOBS installer, and some inspiring project ideas. It’s a perfect visual companion to this guide!

---

*For more in-depth tutorials and community insights, explore our [DIY Electronics](https://www.whypi.org/category/diy-electronics/) and [Electronic Component Reviews](https://www.whypi.org/category/electronic-component-reviews/) categories.*