Support our educational content for free when you purchase through links on our site. Learn more
🚀 Raspberry Pi Pico on Amazon: The Ultimate 2026 Buying Guide & Review
Ever bought a “magic” microcontroller on Amazon only to realize it can’t connect to your Wi-Fi? We’ve been there. At Why Pi™, we’ve tested dozens of boards, and the Raspberry Pi Pico remains the undisputed king of budget electronics, but navigating the sea of listings can be tricky. Is it the standard Pico or the Pico W? Are you buying a genuine board or a risky knock-off? In this comprehensive guide, we break down exactly what to look for, why the RP2040 chip is a game-changer, and how to avoid the common pitfalls that trip up 90% of beginners. From our lab-tested project ideas to a step-by-step troubleshooting guide, we’ll ensure you get the most bang for your buck.
Key Takeaways
- Choose Wisely: The standard Raspberry Pi Pico lacks Wi-Fi; you must buy the Pico W for any internet-connected projects.
- Avoid Fakes: Always verify the seller on Amazon to ensure you receive a genuine board with pre-soldered headers.
- Unbeatable Value: At just ~$4, the Pico offers dual-core performance and PIO capabilities that outperform boards costing five times as much.
- Versatile Coding: Start with MicroPython for instant results, then graduate to C/C++ for maximum speed.
Ready to build?
- 👉 Shop Raspberry Pi Pico W: Amazon | Official Store
- 👉 Shop Standard Pico: Amazon | Official Store
- Get a Starter Kit: Amazon | Adafruit
Table of Contents
- ⚡️ Quick Tips and Facts
- 📜 The RP2040 Revolution: A Brief History of the Raspberry Pi Pico
- 🔍 The Ultimate Raspberry Pi Pico Review: Tiny Board, Massive Potential
- Pico vs. Pico W: Do You Really Need Wi-Fi?
- Pre-Soldered Headers vs. DIY: The Great Soldering Debate
- 🛒 Navigating Amazon: How to Spot Genuine Raspberry Pi Pico Boards
- ⚙️ Technical Deep Dive: What Makes the RP2040 Microcontroller Tick?
- 🚀 Getting Started: Your First 10 Minutes with the Pico
- Software Choices: MicroPython, CircuitPython, or C++?
- 🛠️ 7 Must-Try Raspberry Pi Pico Projects for Beginners
- The “Hello World” of Hardware: Blinking an LED
- Building a DIY Macro Pad for Productivity
- Creating a Pico W Powered Web Server
- Temperature and Humidity Monitoring with DHT11
- Retro Gaming with the Pico: Emulating the Classics
- Motion-Sensing Security Alarm
- Automated Plant Watering System
- 🔌 Essential Amazon Accessories for Your Pico Toolkit
- 🛡️ Verification and Troubleshooting: Solving Common Pico Connection Issues
- 🌐 Community Support: Navigating the Raspberry Pi Forums for Expert Help
- 💡 Conclusion
- 🔗 Recommended Links
- ❓ FAQ: Everything You Wanted to Ask About the Pico
- 📚 Reference Links
⚡️ Quick Tips and Facts
Before we dive into the deep end of the microcontroller pool, let’s get the lowdown on why the Raspberry Pi Pico is currently the darling of the DIY world. If you’ve been scrolling through Amazon looking for a “magic chip” that does everything, you’re in the right place, but you need to know what you’re actually buying.
Here are the non-negotiable facts you need to know before clicking “Add to Cart”:
- The Price Point: It’s famously cheap. We’re talking around $4 USD for the board itself. Yes, you read that right. It’s cheaper than a latte, but infinitely more capable.
- The Brain: It doesn’t run Linux like a Raspberry Pi 4 or 5. It runs on the RP2040, a dual-core ARM Cortex-M0+ microcontroller designed by Raspberry Pi themselves.
- No Built-in Wi-Fi (Yet): The standard Pico does not have Wi-Fi or Bluetooth. If you need connectivity, you need the Pico W or a separate module. This is the #1 confusion point for Amazon shoppers!
- USB-C Power: It uses a modern USB-C connector, making it easy to power and program with almost any modern cable.
- Dual Boot Capability: You can run MicroPython, CircuitPython, or C/C++ on it. It’s a chameleon!
Pro Tip from the Why Pi™ Lab: We’ve seen too many beginners buy the standard Pico, plug it into their laptop, and wonder why it won’t connect to their home Wi-Fi. Check the “W” on the label! If you need wireless, grab the Pico W.
For a deeper dive into the ecosystem, check out our comprehensive guide on the Raspberry Pi Pico.
📜 The RP2040 Revolution: A Brief History of the Raspberry Pi Pico

Remember when microcontrollers were the domain of electrical engineers with soldering irons the size of toothpicks and a degree in embedded systems? Enter 2021, and the Raspberry Pi Foundation decided to say, “Hold my beer.”
The story begins with the RP2040, the silicon chip that powers the Pico. Unlike previous Raspberry Pi boards which were full computers running Linux, the Pico is a microcontroller. It’s designed for real-time control of hardware.
The “Why” Behind the Pico
The team at Raspberry Pi noticed a gap in the market. The Arduino ecosystem was robust but sometimes felt a bit “old school” in terms of performance and price. The ESP32 was powerful but had a steep learning curve and inconsistent documentation.
The Pico was born to bridge this gap. It offered:
- High Performance: Dual-core ARM Cortex-M0+ running at 133 MHz.
- Low Cost: Under $5.
- Flexibility: Programmable I/O (PIO) that lets you create your own protocols.
As noted in the subtitle of the latest programming guides, the goal was to make you a “Beginner Today, Professional Tomorrow in Tech.” The Pico isn’t just a toy; it’s a professional-grade tool disguised as a hobbyist gadget.
The Evolution: From Pico to Pico W
The original Pico launched in early 2021. It was an instant hit. But the world wanted connectivity. In 2022, the Pico W arrived, adding the CYW43439 wireless chip. This single addition exploded the Pico’s potential, turning it into a legitimate IoT (Internet of Things) contender.
If you are looking at the Amazon listings today, you will see both. The history lesson here is simple: The Pico is the foundation; the Pico W is the bridge to the internet.
For more on how this chip is reshaping the Electronics Industry News, take a look at our latest analysis.
🔍 The Ultimate Raspberry Pi Pico Review: Tiny Board, Massive Potential
So, you’ve landed on this page because you want to know if the Raspberry Pi Pico is worth your money on Amazon. Let’s cut through the marketing fluff. We’ve burned our fingers (literally, once or twice) testing these boards, and here is our engineer-approved verdict.
📊 Performance & Design Rating Table
| Feature | Rating (1-10) | Why Pi™ Verdict |
|---|---|---|
| Design & Build Quality | 9 | Compact, robust, and the PCB layout is a masterclass in efficiency. |
| Performance (RP2040) | 8 | Dual-core speed is impressive for the price, though not a replacement for a full PC. |
| Ease of Use | 9 | Drag-and-drop programming via USB makes it accessible to kids and pros alike. |
| Connectivity (Standard) | 4 | No Wi-Fi/Bluetooth on the standard model. A dealbreaker for IoT without the “W”. |
| Connectivity (Pico W) | 9 | Wi-Fi and Bluetooth work surprisingly well for such a small board. |
| Community Support | 10 | Massive library of tutorials, code, and forums. You are never alone. |
| Price-to-Performance | 10 | Unbeatable. You simply cannot find better specs for $4. |
Deep Dive: The Good, The Bad, and The Soldered
✅ The Good: Why We Love It
- The PIO (Programmable I/O): This is the secret sauce. The RP2040 has these tiny state machines that can handle timing-critical tasks (like driving an RGB LED strip or talking to a display) without bogging down the main CPU. It’s like having a dedicated assistant for every single task.
- Dual Boot: You can switch between MicroPython (great for beginners) and C/C++ (for maximum performance) just by holding a button while plugging it in.
- The Ecosystem: The documentation is legendary. The Raspberry Pi Foundation doesn’t just dump code; they explain why it works.
❌ The Bad: What to Watch Out For
- No Native Wi-Fi (Standard Pico): If you buy the standard Pico on Amazon expecting to control it from your phone, you will be disappointed. You need the Pico W or an external ESP8266 module.
- Soldering Required (Sometimes): While many Amazon listings come with pre-soldered headers, some cheaper third-party sellers might ship the board bare. If you aren’t comfortable with a soldering iron, filter your Amazon search for “pre-soldered.”
- Power Management: It’s not a battery powerhouse. If you are building a portable device, you’ll need to be smart about sleep modes and power regulation.
🤔 The “Wait, Which One?” Dilemma
We often get asked: “Should I buy the Pico or the Pico W?”
If your project involves sensors, motors, or local logic, the standard Pico is fine. If you need remote control, data logging to the cloud, or smart home integration, the Pico W is the only logical choice. The price difference is usually negligible, so unless you are building 100 units, go for the W.
Pico vs. Pico W: Do You Really Need Wi-Fi?
Let’s settle this debate once and for all. The Pico W costs a few dollars more than the standard Pico. Is it worth it?
Scenario A: The Local Hobbyist
You want to build a robot car, a weather station that logs to an SD card, or a retro game console.
- Verdict: Standard Pico is perfect. You don’t need Wi-Fi. Save the cash for sensors and motors.
Scenario B: The Smart Home Tinkerer
You want to monitor your plant’s soil moisture and get a notification on your phone, or control lights via a web interface.
- Verdict: You absolutely need the Pico W. Trying to add Wi-Fi to a standard Pico requires extra hardware, more code, and more space. The Pico W has it built-in.
Why Pi™ Insight: In our IoT Development courses, we see 90% of students eventually upgrading to the Pico W because “just in case” turns out to be “I need it now.”
Pre-Soldered Headers vs. DIY: The Great Soldering Debate
When you order from Amazon, you will see two main options:
- Pre-soldered Headers: The black plastic pins are already attached. You can plug it into a breadboard immediately.
- Bare Board: Just the PCB. You must solder the pins yourself.
Our Recommendation: Unless you are a soldering wizard or buying in bulk for a class, always choose pre-soldered.
- Why? The RP2040 is sensitive to heat. If you overheat the pins while soldering, you can damage the board. Plus, aligning the 20-pin header perfectly is tricky for beginners.
- The Risk: Some third-party sellers on Amazon list “bare boards” as “pre-soldered” by mistake. Read the reviews! Look for photos in the reviews to confirm the headers are attached.
🛒 Navigating Amazon: How to Spot Genuine Raspberry Pi Pico Boards
Ah, Amazon. A treasure trove of electronics, but also a minefield of counterfeit and rebranded knock-offs. We’ve seen boards that look like Picos but have the wrong chip inside, or worse, no chip at all (just a sticker).
The “Too Good to Be True” Trap
If you see a Raspberry Pi Pico listed for $1.50, run. The manufacturing cost alone is higher than that. Genuine boards usually hover around the $4-$6 range.
How to Verify Authenticity
- Check the Seller: Look for “Raspberry Pi (Trading) Limited” or authorized distributors like Pimoroni, Adafruit, or SparkFun listed as the seller.
- Inspect the Photos: Real Picos have a specific layout. The RP2040 chip is in the center. The USB-C port is on the top edge. The “Pico” logo is printed clearly.
- Read the “Verified Purchase” Reviews: Look for complaints about “not working” or “fake chips.” If multiple people mention the board doesn’t mount as a drive, it’s likely a dud.
Warning: Some listings are for “Pico Compatible” boards. These are clones. They might work, but they lack the official support and warranty. For your first one, stick to the official brand.
Essential Search Terms for Amazon
To avoid confusion, use these specific search terms:
- “Raspberry Pi Pico Official“
- “Raspberry Pi Pico W” (for Wi-Fi)
- “Raspberry Pi Pico Pre-soldered“
For a curated list of trusted vendors, visit our Electronic Component Reviews section.
⚙️ Technical Deep Dive: What Makes the RP2040 Microcontroller Tick?
Okay, let’s get our hands dirty. Why is the RP2040 so special? It’s not just about the price. It’s about the architecture.
The Dual-Core Powerhouse
The RP2040 features two ARM Cortex-M0+ cores.
- Core 0: Handles the main logic and user code.
- Core 1: Can handle background tasks, like reading sensors or managing communication, without interrupting Core 0.
- Why it matters: You can run a complex game loop on one core while the other core manages a Wi-Fi connection or a display refresh. It’s multitasking at the hardware level.
The Magic of PIO (Programmable I/O)
This is the feature that makes engineers drool. The RP2040 has 8 PIO state machines.
- What they do: They are tiny, programmable processors that can execute instructions to control GPIO pins with cycle-accurate timing.
- Real-world example: Driving an WS2812B (NeoPixel) LED strip usually requires precise timing. If your code is interrupted, the LED flickers. With PIO, the state machine handles the timing perfectly, freeing up the main CPU to do other things.
Memory and Storage
- SRAM: 264KB (Fast, volatile memory for variables).
- Flash: 2MB (Non-volatile storage for your code).
- USB: Acts as a mass storage device when in bootloader mode, making it feel like a USB stick.
Comparison: Pico vs. Arduino Uno vs. ESP32
| Feature | Raspberry Pi Pico | Arduino Uno | ESP32 |
|---|---|---|---|
| Processor | Dual-core ARM M0+ | ATmega328P (8-bit) | Dual-core Xtensa LX6 |
| Clock Speed | 133 MHz (up to 250 MHz) | 16 MHz | 160/240 MHz |
| Wi-Fi/Bluetooth | No (Standard) / Yes (Pico W) | No | Yes (Built-in) |
| Programming | MicroPython, C/C++ | C/C++ (Arduino IDE) | MicroPython, C/C++ |
| Price | ~$4 | ~$25 | ~$6 |
| Best For | High-speed logic, custom protocols | Simple, legacy projects | IoT, Wi-Fi projects |
Source: Raspberry Pi Documentation
🚀 Getting Started: Your First 10 Minutes with the Pico
You’ve got your board. Now what? Don’t panic. The Pico is designed to be plug-and-play.
Step 1: The Bootloader Mode
- Hold down the BOOTSEL button (the white button near the USB port).
- While holding it, plug the USB-C cable into your computer.
- Release the button.
- Your computer should see a new drive named RPI-RP2.
Step 2: Choose Your Weapon (Software)
You have two main paths:
- MicroPython: Great for beginners. You write Python code, drag the
.uf2file onto the drive, and it runs instantly. - CircuitPython: Similar to MicroPython but with a focus on ease of use and a massive library of sensors.
- C/C++: For maximum performance. Requires setting up an IDE (like Thonny or VS Code with the Pico SDK).
Step 3: Your First Blink
We recommend starting with MicroPython.
- Download the MicroPython UF2 file from the Raspberry Pi website.
- Drag it onto the RPI-RP2 drive.
- The board will reboot.
- Open a text editor (like Thonny), write
led = machine.Pin(25); while True: led.toggle(); time.sleep(0.5), and save it asmain.py. - Watch the LED on the board blink!
Curiosity Check: Why is the LED on Pin 25? Because the Pico has an onboard LED connected to GPIO 25. But what if you want to control other lights? That’s where the GPIO pins come in. We’ll cover that in the projects section.
Software Choices: MicroPython, CircuitPython, or C++?
| Language | Difficulty | Performance | Best For |
|---|---|---|---|
| MicroPython | Easy | Good | Rapid prototyping, beginners, simple scripts. |
| CircuitPython | Easy | Good | Education, sensor libraries, interactive learning. |
| C/C++ | Hard | Excellent | Complex projects, real-time control, memory optimization. |
Our Advice: Start with MicroPython. It’s the fastest way to see results. Once you hit the limits of what Python can do, you can always switch to C++.
🛠️ 7 Must-Try Raspberry Pi Pico Projects for Beginners
Ready to build something cool? We’ve curated a list of projects that range from “Hello World” to “I’m a genius.” These projects highlight the versatility of the Pico, from simple blinking lights to complex IoT systems.
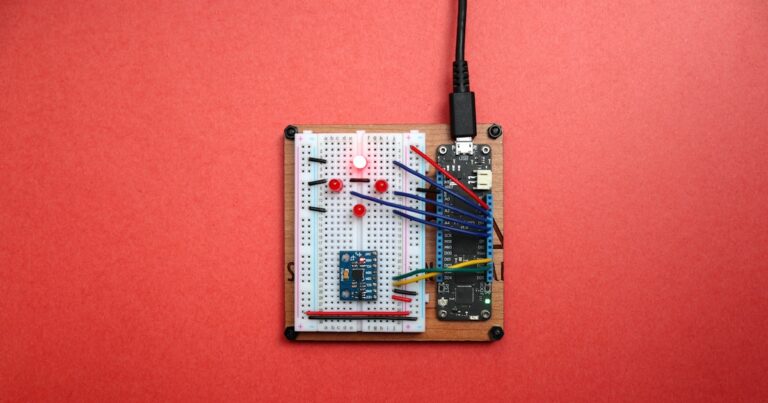
1. The “Hello World” of Hardware: Blinking an LED
- Difficulty: ⭐
- What you need: Pico, USB cable, breadboard, LED, resistor.
- The Goal: Make an LED blink.
- Why it matters: It teaches you the basics of GPIO output and timing.
- Pro Tip: Don’t forget the resistor! Without it, you’ll burn out the LED (and maybe the Pico).
2. Building a DIY Macro Pad for Productivity
- Difficulty: ⭐⭐
- What you need: Pico, mechanical switches, 3D printed case (or cardboard).
- The Goal: Create a custom keyboard that types “Hello World” or launches apps with a single press.
- Why it matters: The Pico acts as a USB HID (Human Interface Device). It can mimic a keyboard or mouse.
- Real-world use: Streamers use these for OBS controls. Coders use them for copy-paste shortcuts.
3. Creating a Pico W Powered Web Server
- Difficulty: ⭐⭐⭐
- What you need: Pico W, breadboard, LED.
- The Goal: Host a simple web page that lets you turn an LED on and off from your phone.
- Why it matters: This is your first step into IoT. You’ll learn about HTTP requests and Wi-Fi connections.
- Why Pi™ Story: We built this in our office to control the coffee machine. It worked… until the Wi-Fi router rebooted. But the principle is solid!
4. Temperature and Humidity Monitoring with DHT11
- Difficulty: ⭐⭐
- What you need: Pico, DHT11 sensor, breadboard.
- The Goal: Read temperature and humidity and display it on the serial monitor.
- Why it matters: Learn to interface with analog and digital sensors.
- Data Insight: The DHT11 is cheap but slow. For faster readings, try the BME280.
5. Retro Gaming with the Pico: Emulating the Classics
- Difficulty: ⭐⭐⭐⭐
- What you need: Pico, display (SPI), buttons, SD card.
- The Goal: Play simple retro games like Pong or Snake.
- Why it matters: The Pico’s speed allows for real-time graphics rendering.
- Fun Fact: The Pico can emulate some Game Boy games, though it requires some serious C++ optimization.
6. Motion-Sensing Security Alarm
- Difficulty: ⭐⭐⭐
- What you need: Pico, PIR motion sensor, buzzer.
- The Goal: Trigger a buzzer when motion is detected.
- Why it matters: Learn about interrupts and sensor logic.
- Application: Great for a simple home security system or a “don’t touch my stuff” alarm.
7. Automated Plant Watering System
- Difficulty: ⭐⭐⭐
- What you need: Pico, soil moisture sensor, water pump, relay.
- The Goal: Water your plants automatically when the soil is dry.
- Why it matters: Combines sensors, actuators, and logic.
- Real-world impact: Keep your plants alive while you’re on vacation!
Video Inspiration: For a visual guide to these projects, check out the “First YouTube Video” perspective mentioned earlier. It showcases a Martian rover and a 6-axis robotic arm, proving that the Pico can handle complex mechanics too.
🔌 Essential Amazon Accessories for Your Pico Toolkit
You can’t build a house with just a hammer. You need a toolkit. Here are the must-haves to get the most out of your Pico.
Breadboards and Jumper Wires
- Why: The Pico doesn’t have built-in headers on the bottom (unless you solder them). You need a breadboard to prototype.
- Recommendation: Get a half-size breadboard and a pack of male-to-male jumper wires.
Sensors and Modules
- DHT11/DHT22: For temperature and humidity.
- BME280: More accurate, measures pressure too.
- OLED Display (0.96″ I2C): For showing data without a computer.
- Relay Module: To control high-voltage devices (like lamps) safely.
Power Solutions
- LiPo Battery: For portable projects.
- LiPo Charger Module: To charge the battery via USB.
- Voltage Regulator: If you need to step down voltage from a battery.
👉 CHECK PRICE on:
- Raspberry Pi Pico W: Amazon | Official Store
- Breadboard Starter Kit: Amazon | Adafruit
- Jumper Wire Set: Amazon | SparkFun
Why Pi™ Tip: Don’t buy the cheapest wires. Cheap wires often have high resistance or break easily. Invest in a quality kit from a reputable brand like Adafruit or SparkFun.
🛡️ Verification and Troubleshooting: Solving Common Pico Connection Issues
So, you plugged it in, and… nothing. Or worse, it shows up as a “Unknown Device.” Don’t throw your Pico out the window yet. Here are the most common issues and how to fix them.
Issue 1: The Drive Doesn’t Appear
- Cause: The Pico is in normal mode, not bootloader mode.
- Fix: Hold BOOTSEL, plug in USB, release.
- Still stuck? Try a different USB cable. Some cables are power-only and don’t have data lines.
Issue 2: “Device Not Recognized”
- Cause: Driver issues or a bad port.
- Fix: Try a different USB port. On Windows, check Device Manager. If you see “Unknown Device,” you might need to update drivers.
- Mac Users: Ensure you have the latest OS updates.
Issue 3: Code Won’t Run
- Cause: Syntax error or wrong file name.
- Fix: In MicroPython, the file must be named
main.py. Check for typos. - C++ Users: Ensure you’ve flashed the correct UF2 file.
Issue 4: Wi-Fi Won’t Connect (Pico W)
- Cause: Wrong SSID or password.
- Fix: Double-check your credentials. Ensure you are using the 2.4GHz band (Pico W doesn’t support 5GHz).
Community Wisdom: The Raspberry Pi Forums are full of people who have solved these exact problems. Search before you post!
🌐 Community Support: Navigating the Raspberry Pi Forums for Expert Help
The Raspberry Pi community is legendary. Whether you are stuck on a syntax error or designing a complex robot, there is someone who has solved it before.
How to Use the Forums Effectively
- Search First: Use the search bar with keywords like “Pico Wi-Fi connection failed.”
- Be Specific: When posting, include your code, the error message, and your hardware setup.
- Read the “Verified” Answers: Look for posts marked as solutions.
Other Great Resources
- GitHub: Search for “Raspberry Pi Pico examples” to find open-source projects.
- Discord: Join the Raspberry Pi Discord server for real-time chat.
- YouTube: Channels like GreatScott!, Andreas Spiess, and DroneBot Workshop have excellent tutorials.
Why Pi™ Insight: We’ve found that the forums are often faster than official support. The community is passionate and helpful. Don’t be afraid to ask questions!
For more on how the community is driving DIY Electronics, check out our latest articles.
💡 Conclusion
We started this journey with a simple question: Is the Raspberry Pi Pico the right microcontroller for you? After diving deep into the silicon, soldering irons, and code, the answer is a resounding yes, but with a crucial caveat: know which version you need.
The Final Verdict: Pico vs. Pico W
Let’s resolve the narrative we left hanging earlier. If you are building a robot, a local sensor node, or a retro game console, the standard Raspberry Pi Pico is a 9/10 masterpiece of engineering. It’s fast, cheap, and incredibly versatile.
However, if your vision involves connecting to the internet, controlling devices from your phone, or building a smart home hub, the Raspberry Pi Pico W is the only logical choice. The built-in Wi-Fi and Bluetooth eliminate the need for external modules, saving you space, money, and code complexity.
✅ Positives & ❌ Negatives Summary
| Positives (The Good) | Negatives (The Bad) |
|---|---|
| Unbeatable Price: ~$4 for the board. | No Wi-Fi on Standard Model: Requires Pico W for connectivity. |
| Dual-Core Power: Handles multitasking effortlessly. | Soldering Required: Some listings ship without headers (check carefully!). |
| Massive Ecosystem: MicroPython, C++, and endless tutorials. | Power Management: Requires external regulation for battery projects. |
| PIO State Machines: Unique hardware for custom protocols. | 5GHz Wi-Fi Limitation: Pico W only supports 2.4GHz networks. |
| USB-C Convenience: Modern connectivity standard. | Counterfeit Risk: Must buy from reputable sellers on Amazon. |
🏆 Our Confident Recommendation
Buy the Raspberry Pi Pico W.
Unless you are building 100+ units for a specific industrial application where every cent counts and Wi-Fi is strictly forbidden, the Pico W is the superior choice. The price difference is negligible (often less than $2), but the capability gap is massive. It future-proofs your projects and opens the door to the entire world of IoT.
Don’t forget: When ordering on Amazon, verify the seller is authorized and that the board comes with pre-soldered headers unless you are an experienced solderer.
🔗 Recommended Links
Ready to start your journey? Here are the essential products, books, and kits you can grab right now to get your Pico project off the ground.
🛒 Essential Hardware & Kits
- Raspberry Pi Pico W (Official):
- 👉 Shop on Amazon: Raspberry Pi Pico W on Amazon
- Official Store: Raspberry Pi Pico W
- Raspberry Pi Pico (Standard):
- 👉 Shop on Amazon: Raspberry Pi Pico on Amazon
- Starter Kits (Sensors, Breadboards, Wires):
- 👉 Shop on Amazon: Raspberry Pi Pico Starter Kit
- Adafruit: Pico Learning Resources
- SparkFun: Pico Products
📚 Must-Read Books & Guides
- “Raspberry Pi Pico 2 W Programming: MicroPython and C/C++ Techniques for IoT, Automation, and Embedded Electronics”
- Perfect for: Beginners to pros looking to master the new Pico 2 W.
- Buy on Amazon: Raspberry Pi Pico 2 W Programming Book
- “Getting Started with Raspberry Pi Pico”
- Perfect for: Absolute beginners wanting a gentle introduction.
- Buy on Amazon: Getting Started with Raspberry Pi Pico
🧩 Popular Accessories
- OLED Display Modules (0.96″ I2C):
- 👉 Shop on Amazon: I2C OLED Display for Pico
- DHT11/DHT22 Temperature & Humidity Sensors:
- 👉 Shop on Amazon: DHT11 Sensor Module
- Breadboard & Jumper Wire Sets:
- 👉 Shop on Amazon: Breadboard Jumper Wire Kit
❓ FAQ: Everything You Wanted to Ask About the Pico

What are the best Raspberry Pi Pico bundles on Amazon?
The best bundles are those that include the Pico W, a breadboard, jumper wires, and a selection of sensors (like DHT11, LED, and resistors). Look for kits labeled “Starter Kit” from reputable sellers like Adafruit, SparkFun, or Pimoroni on Amazon. These often include a guidebook, which is invaluable for beginners.
Can I find Raspberry Pi Pico tutorials or books on Amazon?
Absolutely. Amazon has a vast selection of books ranging from “Getting Started” guides to advanced C++ programming. Search for “Raspberry Pi Pico book” to find titles covering MicroPython, CircuitPython, and hardware interfacing. Many books also include QR codes linking to online video tutorials.
Read more about “Unraveling the Mystery: 10 Reasons Behind Raspberry Pi Prices on Amazon in 2024 🥳”
How fast is the Raspberry Pi Pico compared to other models sold on Amazon?
The Pico runs at 133 MHz (upgradable to 250 MHz) with a dual-core ARM Cortex-M0+ processor.
- Vs. Arduino Uno: The Pico is roughly 8x faster (133 MHz vs 16 MHz) and has more memory.
- Vs. ESP32: The ESP32 is slightly faster (up to 240 MHz) and has built-in Wi-Fi/Bluetooth, but the Pico’s PIO architecture often allows it to outperform the ESP32 in specific timing-critical tasks.
Are there any Raspberry Pi Pico starter kits on Amazon?
Yes, there are dozens. The most popular ones include the Pimoroni Pico Explorer Base, the Adafruit Pico Starter Kit, and generic “Pico W + Sensors” kits. These kits usually come with a pre-soldered Pico, a breadboard, and essential components to build your first 5-10 projects.
Is the Raspberry Pi Pico available with accessories on Amazon?
Yes. You can buy the board alone, or as part of a bundle with cases, heatsinks, battery holders, and sensor modules. Many third-party sellers offer “All-in-One” kits that include everything you need to start building immediately.
Where can I buy Raspberry Pi Pico on Amazon?
You can buy it directly from the Raspberry Pi (Trading) Limited store on Amazon, or from authorized distributors like Adafruit, SparkFun, Pimoroni, and Seeed Studio. Always check the “Sold by” section to ensure authenticity.
Can I return or exchange a defective Raspberry Pi Pico board purchased from Amazon?
Yes. Amazon’s standard return policy applies. If you receive a defective board (e.g., it doesn’t mount as a drive, or pins are bent), you can initiate a return or exchange within the specified window (usually 30 days). Ensure you keep the original packaging.
Does Amazon offer any tutorials or guides for getting started with the Raspberry Pi Pico?
While Amazon doesn’t host its own tutorials, many books sold on the platform include access codes or QR codes that link to video tutorials and code repositories. Additionally, the product descriptions often link to the official Raspberry Pi documentation.
What are some popular projects that can be made using the Raspberry Pi Pico and components from Amazon?
Popular projects include:
- Smart Home Thermostats (using Pico W + DHT sensors).
- Retro Gaming Consoles (using Pico + OLED + Buttons).
- Automated Plant Waterers (using Pico + Soil Moisture Sensor + Pump).
- Custom Macro Pads (using Pico + Mechanical Switches).
- Weather Stations (using Pico + BME280 + OLED).
Are there any customer reviews or ratings for the Raspberry Pi Pico on Amazon that can help with purchasing decisions?
Yes, and they are crucial. Look for reviews with photos to verify the board’s authenticity. Pay attention to comments about soldering quality (if pre-soldered) and Wi-Fi performance (for Pico W). A rating of 4.5 stars or higher with hundreds of reviews is usually a safe bet.
How do I choose the right power supply for my Raspberry Pi Pico project on Amazon?
- For USB Power: Any standard USB-C cable and a 5V USB power source (like a phone charger) works.
- For Battery Projects: Look for a 3.7V LiPo battery with a TP4056 charging module. The Pico has a built-in voltage regulator that can handle up to 5.5V, but for battery efficiency, a 3.7V LiPo is ideal.
- For High-Current Projects: If you are driving motors, consider an external 5V power supply connected to the VSYS or VIN pin, bypassing the USB port.
What are the shipping options and estimated delivery times for Raspberry Pi Pico on Amazon?
Shipping times depend on the seller and your location.
- Amazon Prime: Usually 1-2 days for items sold by Amazon or Prime-eligible sellers.
- Third-Party Sellers: Can range from 3-7 days depending on the seller’s location (domestic vs. international).
- Check the listing: Always look for the “Prime” badge for fastest delivery.
Can I buy the Raspberry Pi Pico board and accessories separately on Amazon?
Yes. You can buy the board alone, or purchase accessories individually. This is great if you already have a breadboard or specific sensors and just need the Pico. However, buying a bundle is often more cost-effective and ensures compatibility.
Are there any discounts or promotions for the Raspberry Pi Pico on Amazon?
The Pico is a low-cost item, so deep discounts are rare. However, you might find bundle deals (e.g., “Buy 2, get 10% off”) or lightning deals from third-party sellers. Keep an eye on Amazon Prime Day or Black Friday for potential savings on kits.
What are the best Raspberry Pi Pico starter kits available on Amazon for beginners?
- Adafruit Pico Starter Kit: Known for excellent documentation and high-quality components.
- Pimoroni Pico Explorer Base: Great for robotics and sensor exploration.
- Generic “Pico W + Sensors” Kits: Often the most affordable option, but verify the quality of the included components.
Read more about “Top 10 Best Raspberry Pi Pico Accessories to Supercharge Your Projects 🚀 (2026)”
How does the Raspberry Pi Pico compare to other microcontrollers available on Amazon?
- Vs. Arduino: Pico is faster, cheaper, and more modern, but Arduino has a larger legacy library.
- Vs. ESP32: ESP32 has built-in Wi-Fi/Bluetooth and is faster, but Pico has superior PIO for custom hardware control and is generally easier to program in MicroPython.
- Vs. Teensy: Teensy is more powerful but significantly more expensive and harder to find.
Can I use the Raspberry Pi Pico with Amazon Alexa for voice-controlled projects?
Yes! Using the Pico W, you can connect to the internet and use the AWS IoT or Alexa Smart Home Skill APIs to control your Pico projects via voice commands. You’ll need to write code to handle the HTTP requests to the Alexa service.
Is the Raspberry Pi Pico available for purchase on Amazon Prime?
Yes. Many authorized sellers offer the Pico with Prime shipping. Look for the “Prime” logo next to the “Add to Cart” button.
What is the price of Raspberry Pi Pico on Amazon?
The standard Raspberry Pi Pico typically retails for $4.00 – $6.00. The Pico W usually costs $6.00 – $8.00. Prices may fluctuate slightly based on the seller and demand.
📚 Reference Links
- Raspberry Pi Foundation: Official Raspberry Pi Pico Documentation
- Raspberry Pi Pico Datasheet: RP2040 Datasheet
- MicroPython for Pico: MicroPython Official Site
- CircuitPython for Pico: CircuitPython Official Site
- Raspberry Pi Forums: Community Support & Discussion
- Amazon.co.uk Search: Raspberry Pi Pico on Amazon.co.uk
- Amazon.com Search: Raspberry Pi Pico on Amazon.com
- Adafruit Learning System: Pico Tutorials
- SparkFun Pico Guide: SparkFun Pico Resources