Support our educational content for free when you purchase through links on our site. Learn more
15+ Beginner-Friendly Raspberry Pi Projects to Build in 2026 🚀
Ever stared at a tiny circuit board and wondered, “What on earth can I actually do with this?” You’re not alone. When we first unboxed our Raspberry Pi, we thought it was just a glorified USB drive until we accidentally turned it into a retro gaming console that played Super Mario better than our old Nintendo. That “aha!” moment is exactly what this guide is about. We’ve compiled the ultimate list of 15+ beginner-friendly Raspberry Pi projects that range from “I just want to play games” to “I want to automate my entire house,” all without needing a degree in electrical engineering. Whether you’re looking to block ads across your whole network with a single line of code or build a robot that follows a line on the floor, we’ve got the step-by-step breakdowns you need.
Key Takeaways
- Start Small, Dream Big: You don’t need to be a coding wizard to begin; projects like Pi-hole and RetroPie require zero programming knowledge and offer instant gratification.
- Hardware Matters: Success often hinges on using a Class 10 microSD card and a stable 5V power supply to avoid frustrating boot loops.
- Learn by Doing: These projects are designed to teach you Python, Linux, and IoT concepts through hands-on building rather than dry theory.
- Community is Key: If you get stuck, the Raspberry Pi Foundation Forums and Stack Overflow are your best resources for troubleshooting.
Ready to build?
- Raspberry Pi Boards: Amazon | Raspberry Pi Official Store
- MicroSD Cards: Amazon | Best Buy
- Starter Kits: Amazon | Adafruit
Table of Contents
- ⚡️ Quick Tips and Facts
- 📜 From Humble Beginings: The History of the Raspberry Pi
- 🛠️ Getting Started: Essential Hardware and Software Setup
- 🚀 15 Beginner-Friendly Raspberry Pi Projects to Spark Your Creativity
- 1. 🖥️ Build Your Own Retro Gaming Console with RetroPie
- 2. 📡 Create a DIY Home Media Center with Kodi
- 3. 🌡️ Monitor Your Home Environment with a Weather Station
- 4. 📸 Set Up a Smart Security Camera System
- 5. 🎵 Stream Music with a Portable Bluetooth Speaker
- 6. 📡 Launch a Private Wi-Fi Network with Pi-hole
- 7. 🤖 Control Robots with Simple Python Scripts
- 8. 📉 Track Your Crypto Portfolio on a Dashboard
- 9. 🌱 Automate Your Garden with a Smart Irrigation System
- 10. 📺 Build a Digital Photo Frame
- 1. 🎮 Create a Custom Arcade Cabinet
- 12. 📡 Set Up a Personal Cloud Storage Server
- 13. 🧠 Learn Python Programming with Interactive Projects
- 14. 🏠 Control Smart Home Devices with Home Assistant
- 15. 📡 Build a Network-Attached Storage (NAS) System
- 🧩 Troubleshooting Common Beginner Pitfalls
- 🛡️ Securing Your Pi: Best Practices for Safety
- 💡 Advanced Tips for Scaling Your Projects
- 🏁 Conclusion
- 🔗 Recommended Links
- ❓ FAQ: Frequently Asked Questions
- 📚 Reference Links
⚡️ Quick Tips and Facts
Before we dive into the glorious world of blinking LEDs and retro gaming, let’s hit the pause button and get our bearings. At Why Pi™, we’ve seen thousands of beginners jump in headfirst, only to get tangled in a mess of cables and confusing commands. Don’t be that person! Here are the golden rules to keep your journey smooth:
- Power is King: Never skimp on the power supply. A flaky 5V adapter is the #1 cause of “why won’t my Pi boot?” headaches. Stick to the official Raspberry Pi Power Supply or a high-quality USB-C PD charger.
- SD Card Matters: Your operating system lives on this tiny card. Use a Class 10 or UHS-I card from reputable brands like SanDisk or Samsung. Cheap, no-name cards are the silent killers of projects.
- The “Headless” Myth: You don’t need a monitor, keyboard, or mouse to start. You can set up your Pi headlessly from your main laptop using SSH. It feels like magic, but it’s just good networking.
- GPIO is Your Playground: Those 40 pins on the top edge? That’s the General Purpose Input/Output. They are the bridge between software and the physical world. Touch them with care (and never with power on!).
- Community is Your Superpower: If you get stuck, the Raspberry Pi Foundation Forums or Stack Overflow are your best friends. The community is incredibly active and helpful.
Did you know? The very first Raspberry Pi, the Model B, was released in 2012 with the goal of promoting basic computer science education in schools. Today, it’s a global phenomenon used in everything from Mars rovers to smart fridges! Learn more about the Raspberry Pi Foundation’s mission.
📜 From Humble Beginings: The History of the Raspberry Pi

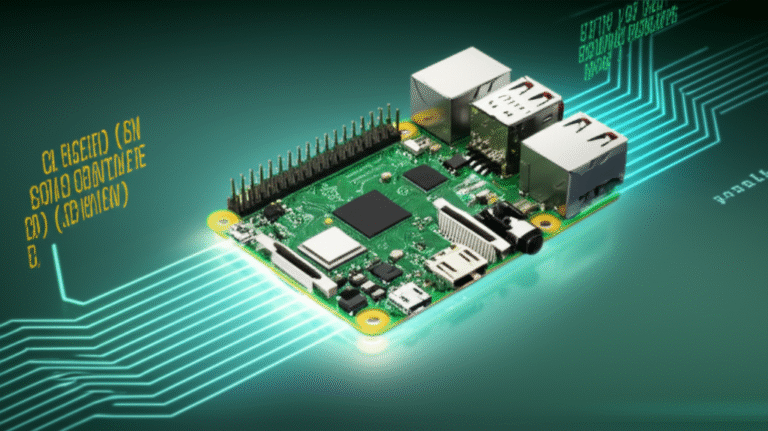
How did a tiny computer the size of a credit card change the world of DIY electronics? It all started with a problem. In the early 20s, the Eben Upton and his team at the University of Cambridge noticed a worrying trend: students were arriving with fewer programming skills than ever before. They were used to playing games, not building them.
The solution? A low-cost, credit-card-sized computer that anyone could afford.
The Evolution of the Pi
The journey has been quite the ride. Here’s a quick look at how the hardware has evolved to support the projects we love today:
| Model | Release Year | CPU | RAM | Key Feature for Beginners |
|---|---|---|---|---|
| Model B (Gen 1) | 2012 | Single-core ARM1 | 256MB | The original! Great for learning Linux basics. |
| Model B+ | 2014 | Quad-core Cortex-A7 | 512MB | Added more USB ports and better power management. |
| Pi 2 Model B | 2015 | Quad-core Cortex-A7 | 1GB | A massive performance jump; made web servers viable. |
| Pi 3 Model B | 2016 | Quad-core Cortex-A53 | 1GB | Built-in Wi-Fi and Bluetooth changed everything! |
| Pi 4 Model B | 2019 | Quad-core Cortex-A72 | 1GB-8GB | USB 3.0, dual 4K HDMI, and desktop-class performance. |
| Pi 5 | 2023 | Quad-core Cortex-A76 | 4GB-8GB | Blazing fast, PCIe support, and active cooling options. |
Data sourced from Raspberry Pi Official Specifications.
The philosophy has remained the same: accessibility. Whether you are a student, a hobbyist, or a professional engineer, the Pi is designed to be a sandbox for your imagination. As the video we’ll discuss later mentions, “The beautiful thing about the Raspberry Pi is that it allows you to integrate with other pieces of hardware.” That integration is the heart of every project we’ll cover.
🛠️ Getting Started: Essential Hardware and Software Setup
So, you’ve decided to join the revolution. Fantastic! But before you can build a retro arcade or a smart home hub, you need to get your hands dirty with the setup. This is where many beginners stumble, but don’t worry, we’ve got your back.
The “Starter Pack” Checklist
You don’t need a warehouse full of gear, but you do need the right foundation. Here is what you need to get your first Pi up and running:
- The Board: The Raspberry Pi 4 Model B or Pi 5 is our top recommendation for beginners due to their speed and connectivity. If you are on a tight budget, the Pi 3 Model B+ is still a workhorse.
- Power Supply: As mentioned, get the official one. For the Pi 4/5, you need a USB-C PD supply.
- MicroSD Card: Minimum 16GB, but we recommend 32GB or 64GB Class 10 cards.
- Case: Keep it cool and dust-free. A simple acrylic or plastic case works wonders.
- Cooling: The Pi 4 and 5 run hot. A heatsink or a small fan is non-negotiable for long-term stability.
- Peripherals: A keyboard, mouse, and HDMI monitor (or TV) for the initial setup.
👉 CHECK PRICE on:
- Raspberry Pi 4 Model B: Amazon | Walmart | Raspberry Pi Official Store
- Raspberry Pi 5: Amazon | Walmart | Raspberry Pi Official Store
- SanDisk MicroSD Cards: Amazon | Best Buy
Software: The Heart of the Beast
The hardware is useless without the soul: the Operating System (OS). The Raspberry Pi Imager is your best friend here. It’s a free, open-source tool that downloads and writes the OS to your SD card in one go.
- Download the Raspberry Pi Imager from the official site.
- Insert your SD card into your computer.
- Select “Raspberry Pi OS” (we recommend the 64-bit version for modern projects).
- Click “Write” and wait.
Pro Tip: While you wait, ask yourself: Why do we need an OS at all? The answer lies in the Linux kernel. It manages the hardware resources, allowing you to run Python scripts, connect to Wi-Fi, and control GPIO pins. Without it, your Pi is just a brick.
Once the OS is written, you can boot up. If you are using a monitor, you’ll see the desktop. If you are going headless, you’ll need to enable SSH in the Imager settings before writing. This allows you to connect to your Pi from your main computer via the command line.
Want to dive deeper into the OS? Check out our comprehensive guide on Raspberry Pi OS and Linux basics.
🚀 15 Beginner-Friendly Raspberry Pi Projects to Spark Your Creativity
Ready to build? We’ve curated a list of 15 projects that range from “I just want to play games” to “I want to automate my entire house.” These aren’t just random ideas; they are carefully selected to teach you specific skills like networking, Python programming, and hardware integration.
Note: We’ve numbered the projects that form a progressive learning path, but feel free to jump to the one that sparks your interest!
1. 🖥️ Build Your Own Retro Gaming Console with RetroPie
Skill Level: Beginner | Time: 2-4 Hours | Cost: Low
Who doesn’t love the nostalgia of 8-bit graphics? RetroPie is a software package that turns your Pi into a dedicated emulation station. It supports thousands of games from systems like the NES, SNES, Sega Genesis, and even the PlayStation 1.
Why it’s great for beginners:
- No Coding Required: It’s all about configuration and downloading ROMs.
- Instant Gratification: You can be playing Super Mario Bros. in under an hour.
- Hardware Learning: You’ll learn to configure USB controllers and HDMI output.
How to do it:
- Flash the RetroPie image onto your SD card using the Imager.
- Boot up and connect a USB controller (an Xbox or PlayStation controller works great).
- Follow the on-screen setup wizard.
- Transfer ROM files to the
romsfolder via USB or network share.
Fun Fact: The Raspberry Pi 4 can emulate almost every console up to the Dreamcast with ease. The Pi 5 pushes this even further!
👉 Shop RetroPie Controllers on:
- 8BitDo: Amazon | 8BitDo Official
- Sony DualShock 4: Amazon | Sony Official
2. 📡 Create a DIY Home Media Center with Kodi
Skill Level: Beginner | Time: 2 Hours | Cost: Low
Turn your TV into a smart hub without paying monthly fees. Kodi (formerly XBMC) is a free, open-source media player that organizes your movies, music, and photos into a beautiful interface.
The “Why”: Unlike commercial streaming services, you own your content. Plus, it supports a massive library of add-ons for live TV and more.
Key Steps:
- Install LibreELEC (a lightweight OS built specifically for Kodi) or install Kodi on top of Raspberry Pi OS.
- Connect your Pi to your TV via HDMI.
- Add your media folders (USB drive or network share).
- Install add-ons for weather, news, or streaming services.
Comparison: Kodi vs. Commercial Streaming
| Feature | Kodi (DIY) | Netflix/Disney+ |
|---|---|---|
| Cost | Free (Hardware cost only) | Monthly Subscription |
| Content | Your files + Add-ons | Proprietary Library |
| Privacy | High (No tracking) | Low (Data collection) |
| Customization | Unlimited | Limited |
3. 🌡️ Monitor Your Home Environment with a Weather Station
Skill Level: Beginner/Intermediate | Time: 3-5 Hours | Cost: Medium
Ever wanted to know the exact temperature and humidity in your garden? Build a weather station! This project introduces you to sensors and data logging.
What you’ll need:
- DHT2 or BME280 sensor (measures temp, humidity, pressure).
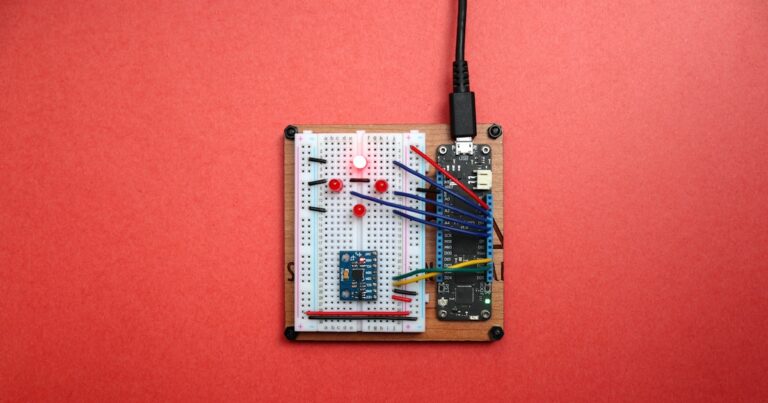
- Breadboard and jumper wires.
- Python script to read data.
The Magic: You can write a simple Python script to read the sensor data and display it on a small LCD screen or send it to a web dashboard. It’s a fantastic introduction to IoT (Internet of Things).
Expert Insight: “Controlling WS2812B LED strips serves as an ideal entry point for beginners because it introduces basic OS package installation and simple circuit design.” While we are doing a weather station here, the logic of reading sensors is the same foundation used for LED control.
👉 Shop Weather Sensors on:
- Adafruit BME280: Amazon | Adafruit Official
- SparkFun DHT2: Amazon | SparkFun Official
4. 📸 Set Up a Smart Security Camera System
Skill Level: Intermediate | Time: 4-6 Hours | Cost: Medium
Forget expensive subscription fees. Build your own motion-activated security camera using a Raspberry Pi Camera Module or a standard USB webcam.
Features you can add:
- Motion detection using MotionEyeOS.
- Email alerts when movement is detected.
- Night vision with an IR LED.
- Cloud storage or local SD card recording.
Why it’s a game-changer: You have full control over your data. No one is watching your feed but you.
👉 Shop Camera Modules on:
- Raspberry Pi Camera Module V2: Amazon | Raspberry Pi Official
- Logitech C920 Webcam: Amazon | Logitech Official
5. 🎵 Stream Music with a Portable Bluetooth Speaker
Skill Level: Beginner | Time: 2-3 Hours | Cost: Low
Turn your Pi into a high-fidelity Bluetooth speaker. This project is perfect for music lovers who want to stream from their phone without the compression of standard Bluetooth.
How it works:
- Use Bluetooth Audio drivers to connect your phone.
- Add a PAM8403 amplifier and a small speaker.
- Power it with a portable battery pack.
The Result: A portable, high-quality speaker that fits in your backpack.
6. 📡 Launch a Private Wi-Fi Network with Pi-hole
Skill Level: Beginner | Time: 1-2 Hours | Cost: Low
Pi-hole is arguably the most utilitarian project for any home network. It acts as a network-wide ad blocker.
Why you need it:
- Block Ads: Stops ads on your phone, TV, and smart devices, not just your browser.
- Speed Up: Pages load faster without ad scripts.
- Privacy: Prevents tracking domains from collecting your data.
The “No-Code” Win: As noted in our video analysis, Pi-hole “teaches networking and OS fundamentals without requiring any programming knowledge or electronic circuitry skills.” It’s the perfect first step into the world of networking.
Installation:
- Install Raspberry Pi OS.
- Run the one-line install command:
curl -sSL https://install.pi-hole.net | bash - Configure your router to use the Pi’s IP as the DNS server.
👉 Shop Raspberry Pi for Pi-hole on:
7. 🤖 Control Robots with Simple Python Scripts
Skill Level: Intermediate | Time: 5-8 Hours | Cost: Medium
Ready to get physical? Build a line-following robot or a remote-controlled car. This project dives deep into GPIO pins and motor drivers.
What you’ll learn:
- How to control DC motors using an L298N motor driver.
- Writing Python scripts to read ultrasonic sensors (for obstacle avoidance).
- Basic robotics logic.
The “Aha!” Moment: When you type motor.forward() in your terminal and the robot actually moves, you’ll understand the power of hardware integration.
👉 Shop Robot Kits on:
- SunFounder Robot Car Kit: Amazon | SunFounder Official
- L298N Motor Driver: Amazon
8. 📉 Track Your Crypto Portfolio on a Dashboard
Skill Level: Intermediate | Time: 4 Hours | Cost: Low
For the finance enthusiasts. Build a dedicated screen that displays your Bitcoin, Ethereum, and other crypto prices in real-time.
Tech Stack:
- Python with the
requestslibrary to fetch API data. - Tkinter or Kivy for the GUI.
- A small HDMI display or a repurposed tablet.
Why it’s cool: It’s a practical application of APIs and JSON data parsing.
9. 🌱 Automate Your Garden with a Smart Irrigation System
Skill Level: Intermediate | Time: 6 Hours | Cost: Medium
Keep your plants alive even when you’re on vacation. This project uses soil moisture sensors to automatically water your plants.
Components:
- Capacitive Soil Moisture Sensor (more durable than resistive ones).
- Relay Module to control a water pump.
- 12V Water Pump and tubing.
Logic: If moisture < 30%, turn on pump for 10 seconds. Simple, effective, and life-saving for your ferns.
👉 Shop Irrigation Parts on:
10. 📺 Build a Digital Photo Frame
Skill Level: Beginner | Time: 3 Hours | Cost: Low
Turn an old monitor or a small HDMI screen into a smart photo frame that slides through your family photos.
Software:
- Use Feh (a lightweight image viewer) or a custom Python script.
- Connect to your Google Photos or Dropbox folder via API.
The Result: A constantly updating gallery of memories on your desk.
1. 🎮 Create a Custom Arcade Cabinet
Skill Level: Advanced Beginner | Time: 10+ Hours | Cost: Medium/High
Take the RetroPie project to the next level by building a physical arcade cabinet. You’ll need wood, buttons, a joystick, and a screen.
Why do it?
- Physicality: There’s nothing like the tactile feel of arcade buttons.
- Design: You can customize the look to match your room.
- Social: It’s the ultimate party piece.
👉 Shop Arcade Parts on:
12. 📡 Set Up a Personal Cloud Storage Server
Skill Level: Intermediate | Time: 5 Hours | Cost: Medium
Stop paying for Google Drive or Dropbox. Build your own Nextcloud server.
Benefits:
- Privacy: Your data stays on your hardware.
- Cost: One-time hardware cost, no monthly fees.
- Features: File sync, photo backup, calendar, and contacts.
How to: Install Nextcloud on Raspberry Pi OS and connect a USB hard drive.
👉 Shop USB Hard Drives on:
- Seagate Expansion Drive: Amazon | Seagate Official
13. 🧠 Learn Python Programming with Interactive Projects
Skill Level: All Levels | Time: Ongoing | Cost: Low
The Pi is the ultimate Python learning tool. Start with “Hello World” and move to controlling hardware.
Resources:
- Thony IDE: Comes pre-installed on Raspberry Pi OS.
- Projects: Blink an LED, read a sensor, control a servo.
Why Python? It’s readable, powerful, and the standard for IoT. As the video suggests, “It’s a great intro to understanding how to start to program and web services.”
14. 🏠 Control Smart Home Devices with Home Assistant
Skill Level: Intermediate/Advanced | Time: 6+ Hours | Cost: Medium
Unify your smart home. Home Assistant is an open-source platform that integrates devices from different brands (Philips Hue, Tuya, Sonoff, etc.) into one dashboard.
The Power:
- Create automations: “If motion detected at night, turn on hallway light.”
- Local control: No cloud dependency for faster response.
- Privacy: Your smart home data stays local.
👉 Shop Smart Home Devices on:
- Philips Hue Starter Kit: Amazon | Signify Official
- Tuya Smart Plugs: Amazon
15. 📡 Build a Network-Attached Storage (NAS) System
Skill Level: Advanced Beginner | Time: 6 Hours | Cost: Medium
Similar to the personal cloud, but focused on file storage and media serving. Use OpenMediaVault (OMV) to turn your Pi into a powerful NAS.
Use Cases:
- Centralized backup for all your computers.
- Media server for your TV.
- File sharing with friends and family.
👉 Shop NAS Enclosures on:
- USB 3.0 Enclosure: Amazon
🧩 Troubleshooting Common Beginner Pitfalls
Even the best engineers hit a wall. Here are the most common issues we see at Why Pi™ and how to fix them.
“My Pi Won’t Boot!”
- Check the Power: Is the LED on? If not, try a different cable or power supply.
- Check the SD Card: Did you flash it correctly? Try re-flashing with the Raspberry Pi Imager.
- Check the HDMI: Is your monitor on the right input? Try a different cable.
“It’s Running Slow!”
- Overheating: Touch the chip. Is it hot? Add a heatsink or fan.
- SD Card Speed: If you’re using a cheap card, upgrade to a Class 10 or UHS-I card.
- Background Processes: Too many apps running? Check your CPU usage with
htop.
“I Can’t Connect to Wi-Fi!”
- Credentials: Double-check your password.
- Region: Ensure your Wi-Fi region is set correctly in the config.
- Signal Strength: Move the Pi closer to the router.
Remember: Every error is a learning opportunity. The command line is your friend, not your enemy.
🛡️ Securing Your Pi: Best Practices for Safety
Once your Pi is up and running, you need to lock it down. A default Raspberry Pi is like an open door.
Essential Security Steps
- Change the Default Password: The default user is
piand the password israspberry. Change it immediately!
passwd
- Disable SSH Password Login: Use SSH keys instead of passwords for remote access.
- Update Regularly: Run
sudo apt update && sudo apt upgradefrequently. - Firewall: Use UFW (Uncomplicated Firewall) to block unnecessary ports.
- Fail2Ban: Install this tool to block brute-force login attempts.
Why it matters: Your Pi is connected to the internet. Without security, it can be hijacked for botnets or data theft.
👉 Shop Security Tools on:
- UFW Guide: Ubuntu Official
- Fail2Ban: Fail2Ban Official
💡 Advanced Tips for Scaling Your Projects
You’ve built your first project. Now what? Here’s how to take it to the next level.
1. Optimize Your Code
- Use virtual environments (
venv) to manage Python dependencies. - Write modular code: Break your scripts into functions.
- Use Git to version control your projects.
2. Expand Your Hardware
- HATs: Add Hardware Attached on Top (HATs) for specific functions like audio, robotics, or AI.
- GPIO Expansion: Use I2C or SPI buses to connect multiple sensors.
3. Automate Everything
- Use Cron jobs to run scripts at specific times.
- Set up systemd services to run your apps in the background.
4. Monitor Your System
- Use Grafana and InfluxDB to visualize your data.
- Set up alerts for temperature or disk usage.
The Future: The Raspberry Pi ecosystem is constantly evolving. With the Pi 5, you have PCIe support, which opens up even more possibilities like NVMe storage and high-speed networking.
Final Thought: “The Raspberry Pi is a little mini computer and it has an operating system in it.” But it’s what you do with it that matters. From a simple LED blink to a full-scale smart home, the limit is your imagination.
Ready to scale up? Check out our advanced guides on Raspberry Pi HATs and Expansion.
🏁 Conclusion
 screen mounted on top of Raspberry Pi 4 Model B by Why Pi")
We’ve traveled a long way from the humble origins of the Raspberry Pi in a Cambridge classroom to the bustling ecosystem of 15+ projects we just explored. Remember that question we posed early on: Why do we need an OS at all? Now you know—it’s the bridge that turns a silicon chip into a gaming console, a security camera, or a smart home brain.
The journey of a thousand miles begins with a single print("Hello World"). Whether you chose to build the RetroPie arcade for nostalgia, the Pi-hole for a cleaner internet, or the Home Assistant for total home control, you’ve taken the first step into the world of maker culture.
The Verdict: Is the Raspberry Pi Worth It?
While this article covered projects rather than a single product review, the Raspberry Pi itself is the star. Here is our final breakdown:
| Aspect | Rating (1-10) | Why? |
|---|---|---|
| Versatility | 10 | From media centers to robotics, it does it all. |
| Ease of Use | 9 | With tools like Raspberry Pi Imager, setup is a breeze. |
| Community Support | 10 | Millions of tutorials, forums, and code snippets available. |
| Cost-Effectiveness | 9 | Unbeatable value for the hardware capabilities. |
| Power Limitations | 6 | Not a replacement for a full desktop PC for heavy tasks. |
| Learning Curve | 7 | Requires patience with Linux and GPIO, but rewarding. |
Our Confident Recommendation:
If you have even a slight curiosity about how computers work, want to learn Python, or dream of building your own smart home, the Raspberry Pi is an absolute must-buy. It is the most accessible entry point into the world of engineering and coding available today. Don’t let the fear of the command line stop you; the community is there to guide you, and the projects are designed to be fun, not frustrating.
Final Thought: As we mentioned in the history section, the Pi was built to teach. But it has evolved into a tool for creation. So, what are you waiting for? Grab a board, flash an SD card, and start building. The only limit is your imagination.
🔗 Recommended Links
Ready to get your hands dirty? Here are the essential tools, books, and hardware to kickstart your journey.
🛒 Essential Hardware & Kits
- Raspberry Pi 4 Model B (4GB/8GB): The sweet spot for most projects.
- Amazon | Walmart | Raspberry Pi Official Store
- Raspberry Pi 5: For those needing maximum performance.
- Amazon | Walmart | Raspberry Pi Official Store
- Official Raspberry Pi Power Supply (USB-C): Don’t skimp on power!
- Amazon | Adafruit
- SanDisk Ultra microSDXC UHS-I Card (32GB/64GB): Reliable storage for your OS.
- Amazon | Best Buy
- 8BitDo Pro 2 Bluetooth Controller: The best controller for RetroPie.
- Amazon | 8BitDo Official
- Raspberry Pi Camera Module V2: Essential for security and vision projects.
- Amazon | Raspberry Pi Official
- SunFounder Robot Car Kit V4.0: A complete kit for learning robotics.
- Amazon | SunFounder Official
📚 Must-Read Books
- “Raspberry Pi User Guide” by Eben Upton and Gareth Halfacree: The definitive guide to the hardware and software.
- Amazon
- “Python Programming for the Raspberry Pi” by Derek Moloy: Master the language that powers the Pi.
- Amazon
- “Make: Getting Started with Raspberry Pi” by Jason Andrews: Perfect for absolute beginners.
- Amazon
❓ FAQ: Frequently Asked Questions

What beginner Raspberry Pi projects help learn programming?
The best projects for learning Python are those that interact with hardware.
- Blinking an LED: Teaches basic output control.
- Reading a Sensor (DHT2): Teaches input and data handling.
- Building a Weather Station: Combines input, logic, and output (displaying data).
- Home Assistant: Introduces complex logic, APIs, and automation scripts.
These projects force you to write code that has a tangible result, making the learning process engaging and immediate.
Read more about “How Is Pi Used in Real-World Applications? 6 Surprising Ways 🔍 (2026)”
How do I build a beginner-friendly Raspberry Pi weather station?
Building a weather station is a fantastic entry point.
- Hardware: You need a BME280 or DHT2 sensor, a breadboard, and jumper wires.
- Wiring: Connect the sensor’s VCC to 3.3V, GND to GND, and data pins to GPIO 2 and 3 (I2C).
- Software: Install the
Adafruit_CircuitPython_BME280library usingpip. - Code: Write a simple Python script to read temperature, humidity, and pressure, then print them to the terminal or a small LCD screen.
This project teaches I2C communication, a fundamental protocol in electronics.
Read more about “12 Most Common Raspberry Pi Uses in DIY & Prototyping (2025) 🚀”
What are some fun Raspberry Pi projects for beginners?
Fun is subjective, but these are universally popular:
- RetroPie: Relive childhood games.
- Pi-hole: Block ads on your entire network (a “magic” feeling).
- Magic Mirror: A two-way mirror that displays weather and news.
- Digital Photo Frame: Display your memories automatically.
- Portable Bluetooth Speaker: Stream music from your phone.
These projects offer instant gratification and are highly shareable with friends and family.
Read more about “Arduino vs. Raspberry Pi Pico: 12 Shocking Differences (2026) 🚀”
Which Raspberry Pi projects require minimal coding skills?
If you want to avoid heavy coding, focus on pre-built software projects:
- RetroPie: Mostly configuration and ROM management.
- Pi-hole: One-line install command.
- Kodi Media Center: Point-and-click setup.
- Home Assistant: Uses a visual “Add-on” store and drag-and-drop automations (though some YAML editing helps later).
These projects rely on community-maintained images that handle the complex coding for you.
What basic Raspberry Pi projects can kids try?
Kids love projects that are visual and interactive:
- Blinking LED: The “Hello World” of hardware.
- Traffic Light System: Use three LEDs to simulate a traffic light.
- Simple Robot Car: Control a car with a gamepad.
- Weather Station: See real-time data from their room.
- Retro Arcade: Play classic games.
These projects are safe, educational, and provide a sense of achievement quickly.
Read more about “Can Raspberry Pi Unlock Coding Skills? 12 Reasons Why It Works! 🚀 (2026)”
How can I start learning Raspberry Pi with simple projects?
Start small!
- Get the hardware: Pi, SD card, power, monitor.
- Install the OS: Use the Raspberry Pi Imager.
- Learn the basics: Open the terminal and try
ls,cd,sudo apt update. - First Project: Blink an LED using the GPIO Zero library in Python.
- Expand: Move to sensors, then networking.
The key is iteration. Don’t try to build a robot on day one. Master the LED first.
Read more about “🖥️ 12+ OS Options for Your Raspberry Pi (2026 Guide)”
What are easy Raspberry Pi projects for beginners?
The easiest projects are those with minimal wiring and pre-made software:
- Pi-hole: Just install and configure DNS.
- Kodi: Install and add media.
- RetroPie: Install and add ROMs.
- Simple Web Server: Host a basic HTML page.
These require little to no soldering or complex circuit design.
Read more about “🚀 Raspberry Pi Pico on Amazon: The Ultimate 2026 Buying Guide & Review”
What are the essential tools and software required for Raspberry Pi development and coding?
- Hardware: Raspberry Pi board, SD card, power supply, case, heatsink/fan.
- Software: Raspberry Pi Imager (for OS), Thony IDE (for Python), VS Code (for advanced coding), PuTTY (for SSH).
- Peripherals: Keyboard, mouse, monitor (for initial setup).
- Electronics: Breadboard, jumper wires, LEDs, resistors, sensors.
Having these ready before you start saves hours of frustration.
How do I choose the right Raspberry Pi model for my project needs?
- Raspberry Pi 4/5: Best for media centers, Home Assistant, NAS, and heavy multitasking.
- Raspberry Pi 3 B+: Good for RetroPie, Pi-hole, and basic automation.
- Raspberry Pi Zero 2 W: Perfect for portable projects, wearables, and low-power sensors.
- Raspberry Pi Pico: Great for pure electronics and microcontroller tasks (not a full Linux computer).
Choose based on performance needs and form factor.
Read more about “Top 12 Raspberry Pi Operating Systems to Try in 2026 🚀”
What are some fun and easy Raspberry Pi projects for kids and adults?
- For Kids: Blinking LED, Simple Robot, Retro Games.
- For Adults: Pi-hole, Home Assistant, Personal Cloud, Security Camera.
- For Both: Weather Station, Digital Photo Frame, Magic Mirror.
The beauty of the Pi is that it scales with your skill level.
Can I use Raspberry Pi for home automation projects as a beginner?
Absolutely! Home Assistant is the gold standard for beginners. It provides a user-friendly interface to control lights, thermostats, and locks from different brands. You don’t need to code to start; you just connect devices and create simple automations. It’s the perfect gateway into the IoT world.
Read more about “12 Beginner-Friendly Raspberry Pi Pico Projects to Try in 2026 🚀”
What programming languages are supported by Raspberry Pi for beginners?
- Python: The primary language. Pre-installed, easy to read, and powerful for hardware control.
- C/C++: For performance-critical tasks and low-level hardware access.
- Scratch: Great for kids and visual learners.
- JavaScript/Node.js: For web servers and IoT backends.
- Bash: For system scripting and automation.
Start with Python; it’s the most beginner-friendly and widely supported.
Read more about “🚀 8 Epic Raspberry Pi Projects to Master in 2026”
How do I set up my Raspberry Pi for the first time?
- Download Raspberry Pi Imager.
- Insert SD card into your computer.
- Select Raspberry Pi OS and your SD card.
- Click Settings (gear icon) to enable SSH and set your Wi-Fi credentials.
- Click Write.
- Insert the card into the Pi, connect power, and wait for it to boot.
- Connect via SSH from your computer or use a monitor.
Read more about “🤯 Raspberry Pi Pico Schematic: The Ultimate 2026 Deep Dive”
What are the basic components required to start a Raspberry Pi project?
- Raspberry Pi Board
- MicroSD Card (16GB+)
- Power Supply (Official recommended)
- Case (Optional but recommended)
- Cooling (Heatsink or Fan)
- Peripherals (Keyboard, Mouse, Monitor)
- Internet Connection (Wi-Fi or Ethernet)
- SD Card Reader (if your computer doesn’t have one)
Read more about “What Is Raspberry Pi Pico Used For? 12 Brilliant Projects & Hacks (2026) 🚀”
📚 Reference Links
For those who want to dive deeper, verify facts, or find the original sources of our inspiration, here are the most reliable resources:
- Raspberry Pi Foundation: The official home of the Pi, documentation, and community.
- https://www.raspberrypi.org
- Raspberry Pi Official Store: Where to buy genuine hardware.
- https://www.raspberrypi.com/products/
- Raspberry Pi Forums: The largest community for troubleshooting and project ideas.
- https://forums.raspberrypi.com
- Adafruit Learning System: Excellent tutorials for electronics and sensors.
- https://learn.adafruit.com
- SparkFun Tutorials: Great guides for hardware integration.
- https://learn.sparkfun.com
- Pi-hole Documentation: The official guide for setting up your ad blocker.
- https://docs.pi-hole.net
- Home Assistant Documentation: The ultimate resource for smart home automation.
- https://www.home-assistant.io
- RetroPie Documentation: Setup and configuration for your retro console.
- https://retropie.org.uk/docs
- Kodi Wiki: The official guide for the media center software.
- https://kodi.wiki
- Dallas Blowers – Medium: “5 Beginner Raspberry Pi Projects” (Note: Content may behind a CAPTCHA, but the title remains a popular search term for project lists).
- https://dallasblowers.medium.com/5-beginer-raspberry-pi-projects-4e20757ea58c
- Python.org: The official Python language documentation.
- https://www.python.org
- Stack Overflow: The go-to place for coding questions and solutions.
- https://stackoverflow.com